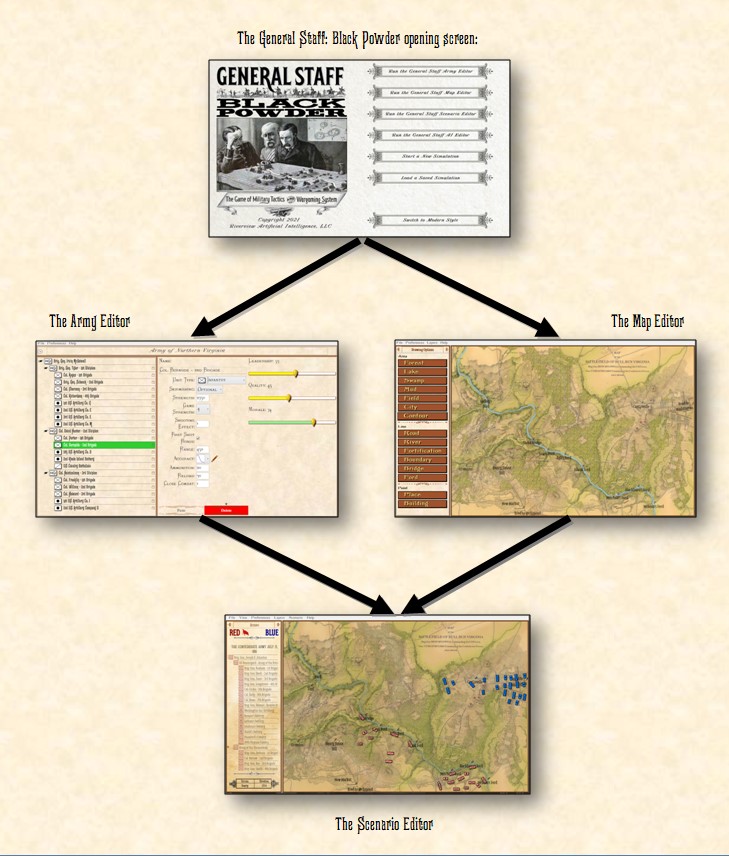
Category Archives: Wargames

Why Machines May Kill Us In Our Sleep

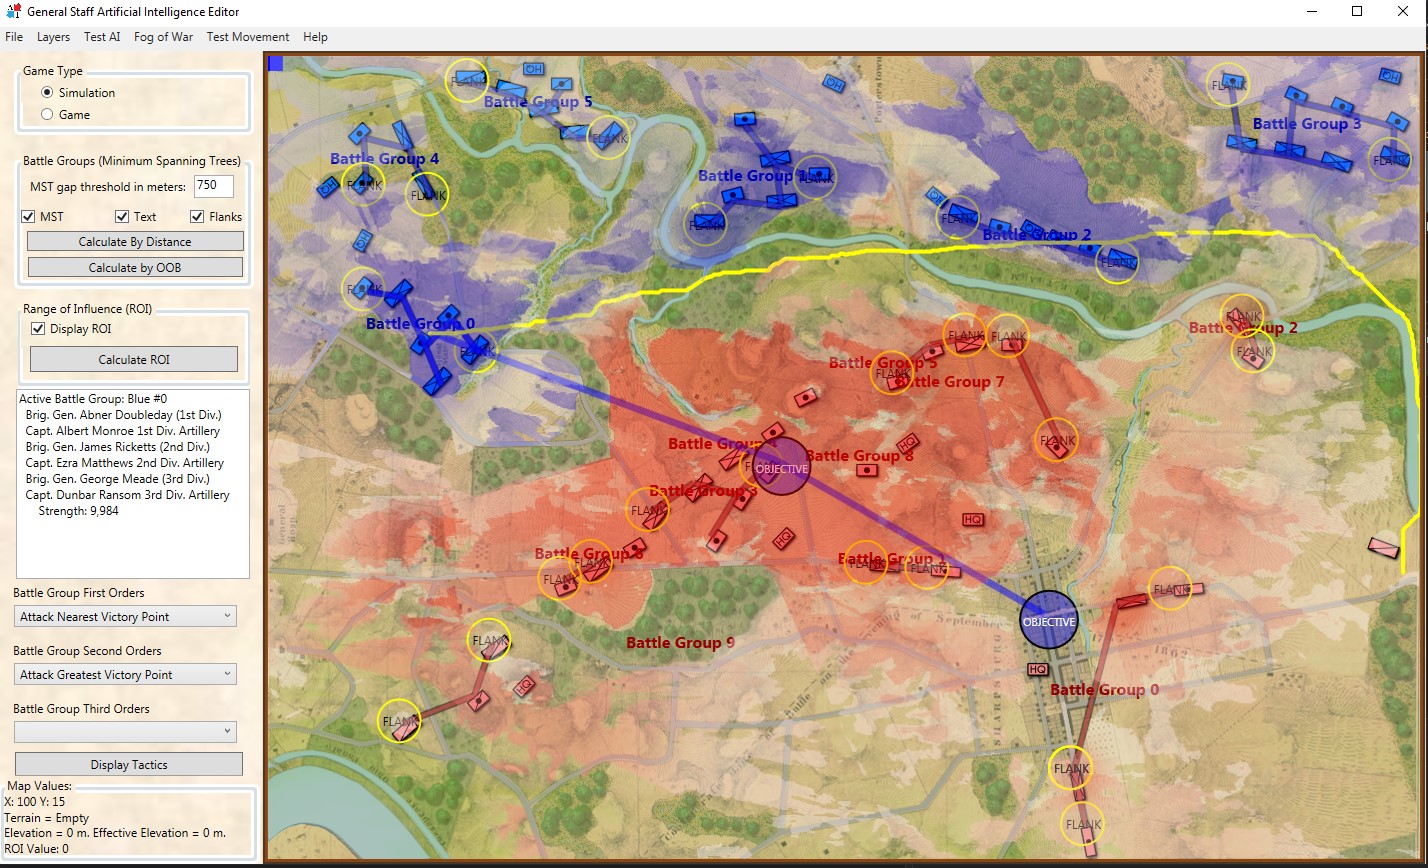
An amazing screen capture of the AI’s solution to a problem. It has found a 1 pixel gap between the data and the edge of the screen and is exploiting it to successfully find an ‘open flank’ of Red. Click to enlarge.

Professor Alberto M. Segre was my thesis advisor and one day he said to me, “You know when your AI is really working because it will surprise you.” Today I got to have one of those weird surprises.

The screen shot (above) is a visual representation of what the AI is up to. You won’t get to see this in the actual game. The program that’s running is called the AI Editor which is a bit of a misnomer because you don’t actually edit the AI in it; you mostly just get to observe what it’s doing. There’s a lot of stuff going on in the above image. There are multiple layers visually displaying different types of data (check out the blog – Layers: Why a Military Simulation is Like a Parfaitfor more information about these). But, what interests us are the AI layers: Battle Groups, Objectives, and that thin yellow line that snakes from a group of blue units, crossing Antietam Creek at the Middle Bridge and then, amazingly, exploiting a data anomaly to reach its goal: a point far behind enemy lines.

Some background on the situation:

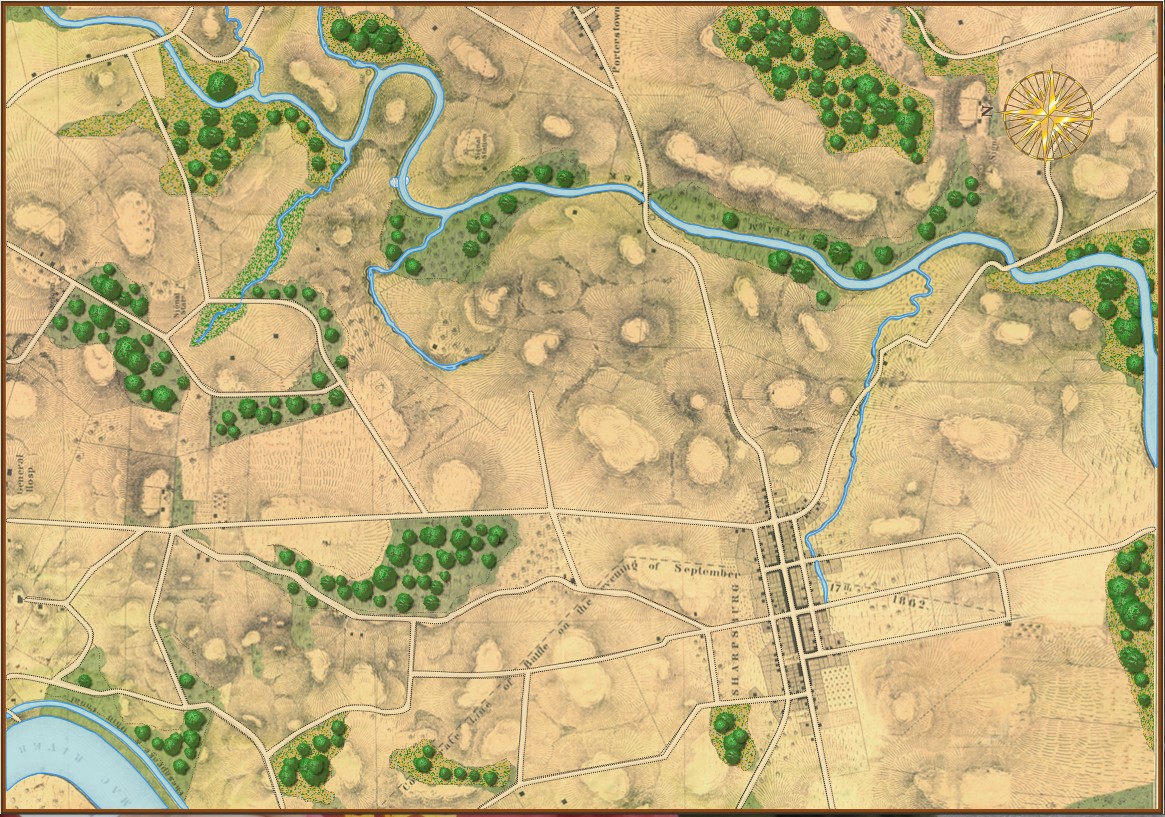
The map of the Antietam Battlefield (screen shot) with terrain and elevation layers displayed. Click to enlarge.

Underlying all the clutter from the first screen capture, top, is the battle of Antietam (above). The map has been rotated 90 degrees to the left so north is now pointing to the left; east is at the top of the screen.

After adding Blue (Union) and Red (Confederate) units to the map in their historical positions at 0600 September 17, 1862 the AI performed a tactical analysis from the perspective of Blue.

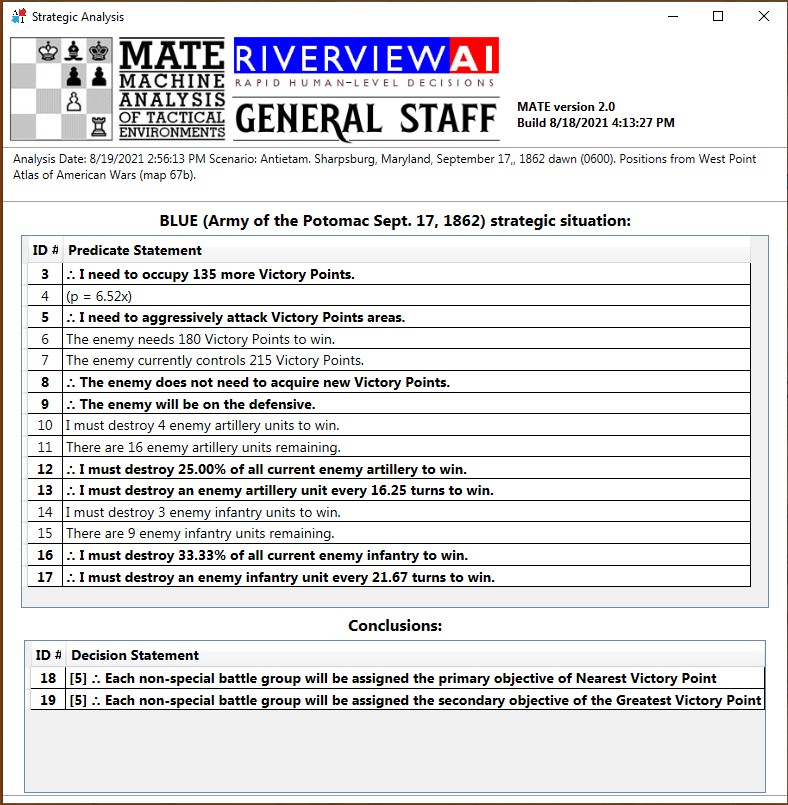
The AI ‘strategic’ analysis for Antietam playing Blue (Union).

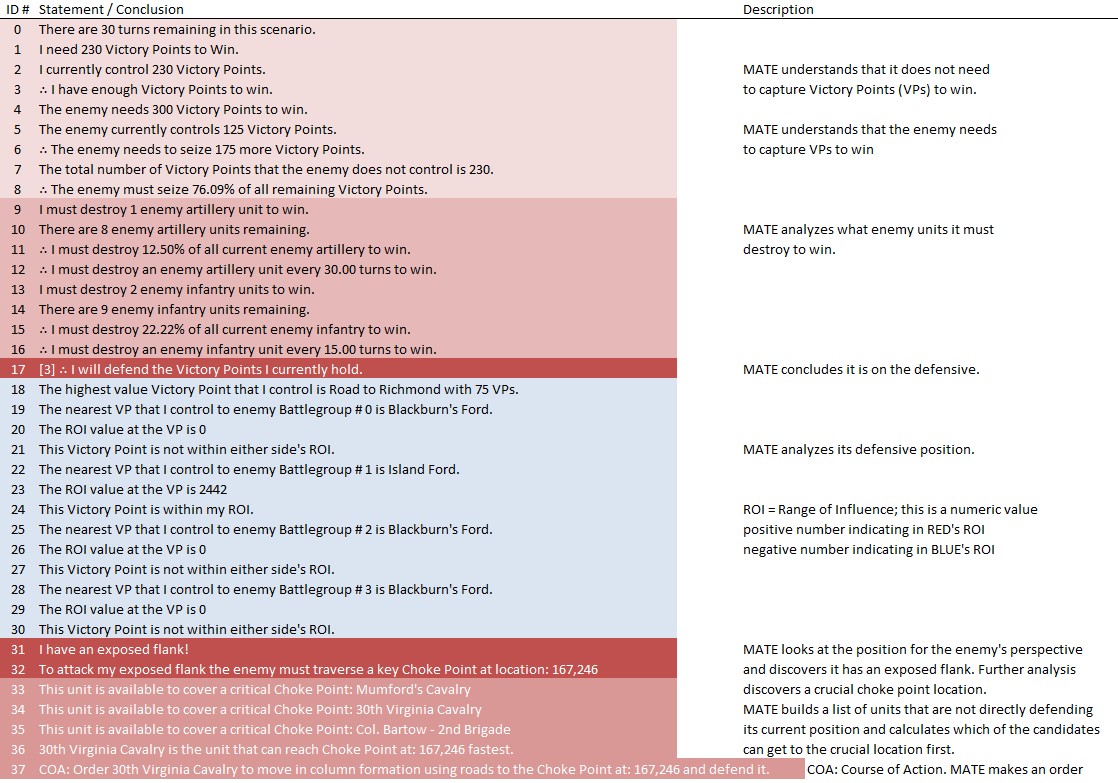
The above are a list of Predicate Statements all of which the AI knows to be true. Statements preceded by the logical sign ∴ (therefore) are conclusions, or inferences, derived from the predicate statement referenced in the brackets. It is this analysis that determines if the AI will be on the offensive or defensive and what its objectives will be.

Next, the AI performs Range of Influence (ROI) calculations for the entire observable battlefield. I plan on doing a video about this later, but for now the darker the red (in the topmost screen capture) the more – and more powerful – weapons the Red army can bear on that point.  The AI next divides all the units on the map into a forest of minimum spanning trees called Battle Groups. I want to do a video about this, too. However, if you can’t wait, these subjects are covered in my paper, Implementing the Five Canonical Offensive Maneuvers in a CGF Environment (free download).

Again, referring to the top screenshot you can see the AI’s calculations to this point:

  • It has determined it (Blue) will be on the offensive.
  • It has calculated enemy ROI.
  • It has assigned objectives to the first Battle Group.

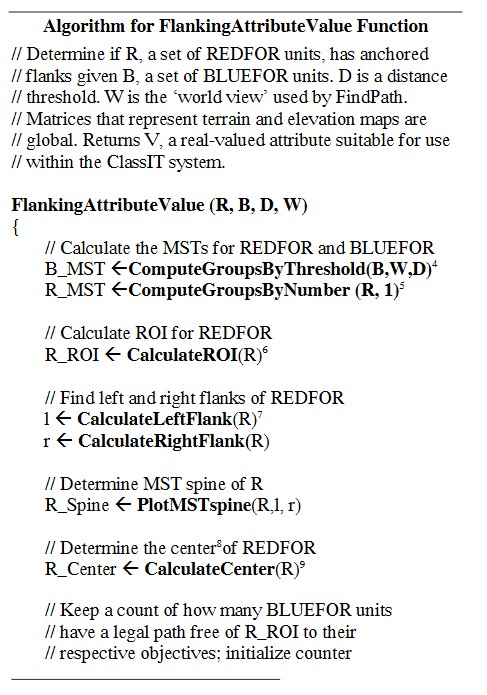
Flanking Algorithm published in, “Algorithms for Generating Attribute Values for the Classification of Tactical Situations”. Click to enlarge.

Now the AI needs to determine if the enemy has an ‘open or unanchored flank’. In Algorithms for Generating Attribute Values for the Classification of Tactical Situations I published the Algorithm for Flanking Attribute Value Function (right). It basically comes down to this: can the AI trace an unbroken path from the center of the Blue Battle Group to a specific point (called the Retreat Point) far behind enemy lines without crossing into ‘No Go Areas’ (water, swamp) or entering any area controlled by Red’s ROI (literally the red areas in the topmost screen shot).

The reason that I was using Antietam as a test case for anchored / unanchored flanks is because years ago I had analyzed the battle for my doctoral thesis and knew it to be a classic example of anchored flanks; Lee’s left flank rests on the Potomac and his right flank is anchored on the Antietam. Granted, the Confederate flanks were held by Stuart’s cavalry with a little horse artillery support but they were still, by definition, anchored flanks.

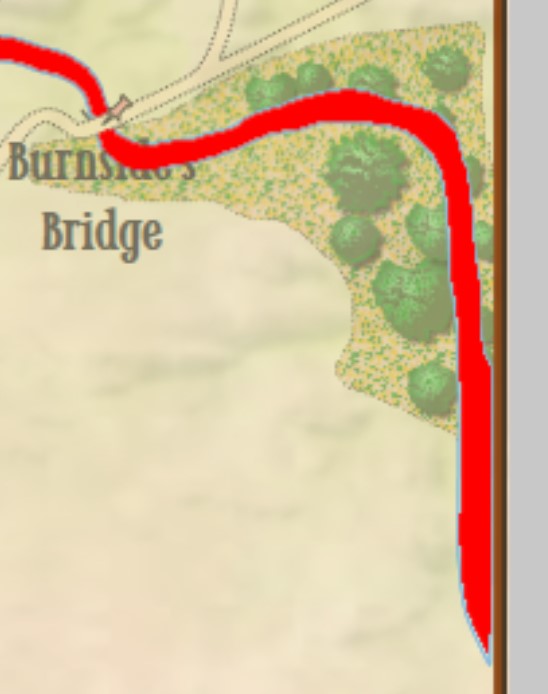
Due to an error in the data that made up the Antietam terrain map a 1 pixel (about 3.8 meter wide) strip of ‘no terrain’ was inserted at the far right hand edge of the map (see blow up of screen capture, right; it’s the thin line between the water, represented in red, and the brown edge of the map). This meant there was a ‘land bridge’ across Antietam Creek where none existed in real life. A digital parting of the Red Sea, if you will. But, by the rules of the game the AI perfectly performed its function. There was no error in the AI – again, the AI performed better than I had dared hope – the error was with the data set.

And that’s how fifty years from now I can see a cyber-detective standing over the chalk marks around a body saying, “Yeah, the machine performed perfectly, brilliantly, in fact. But, the error in the data set killed him.”

It’s already happened in real life. For cars with autopilot the data set of the world in which it operates is crucial. However, “against a bright spring sky, the car’s sensors system failed to distinguish a large white 18-wheel truck and trailer crossing the highway, Tesla said. The car attempted to drive full speed under the trailer, “with the bottom of the trailer impacting the windshield of the Model S”, Tesla said.” The driver died. The AI functioned perfectly. But, the error in the data set killed him.

So, I fixed the error in the data set (probably caused by not using the right values in InkScape when I converted the Antietam Water.bmp into paths) and imported it back into the Antietam map using the General Staff Map Editor, saved it out, and ran the AI Editor again and saw this:

The AI did not display a yellow path from the center of the Blue Battle Group to the Red Retreat Point because none existed. Instead, it just wrote the first Predicate Statement in the Tactical Analysis stack: “Red’s flanks are anchored”.

Again, the machine was performing perfectly. And its results were no longer surprising.

Addendum

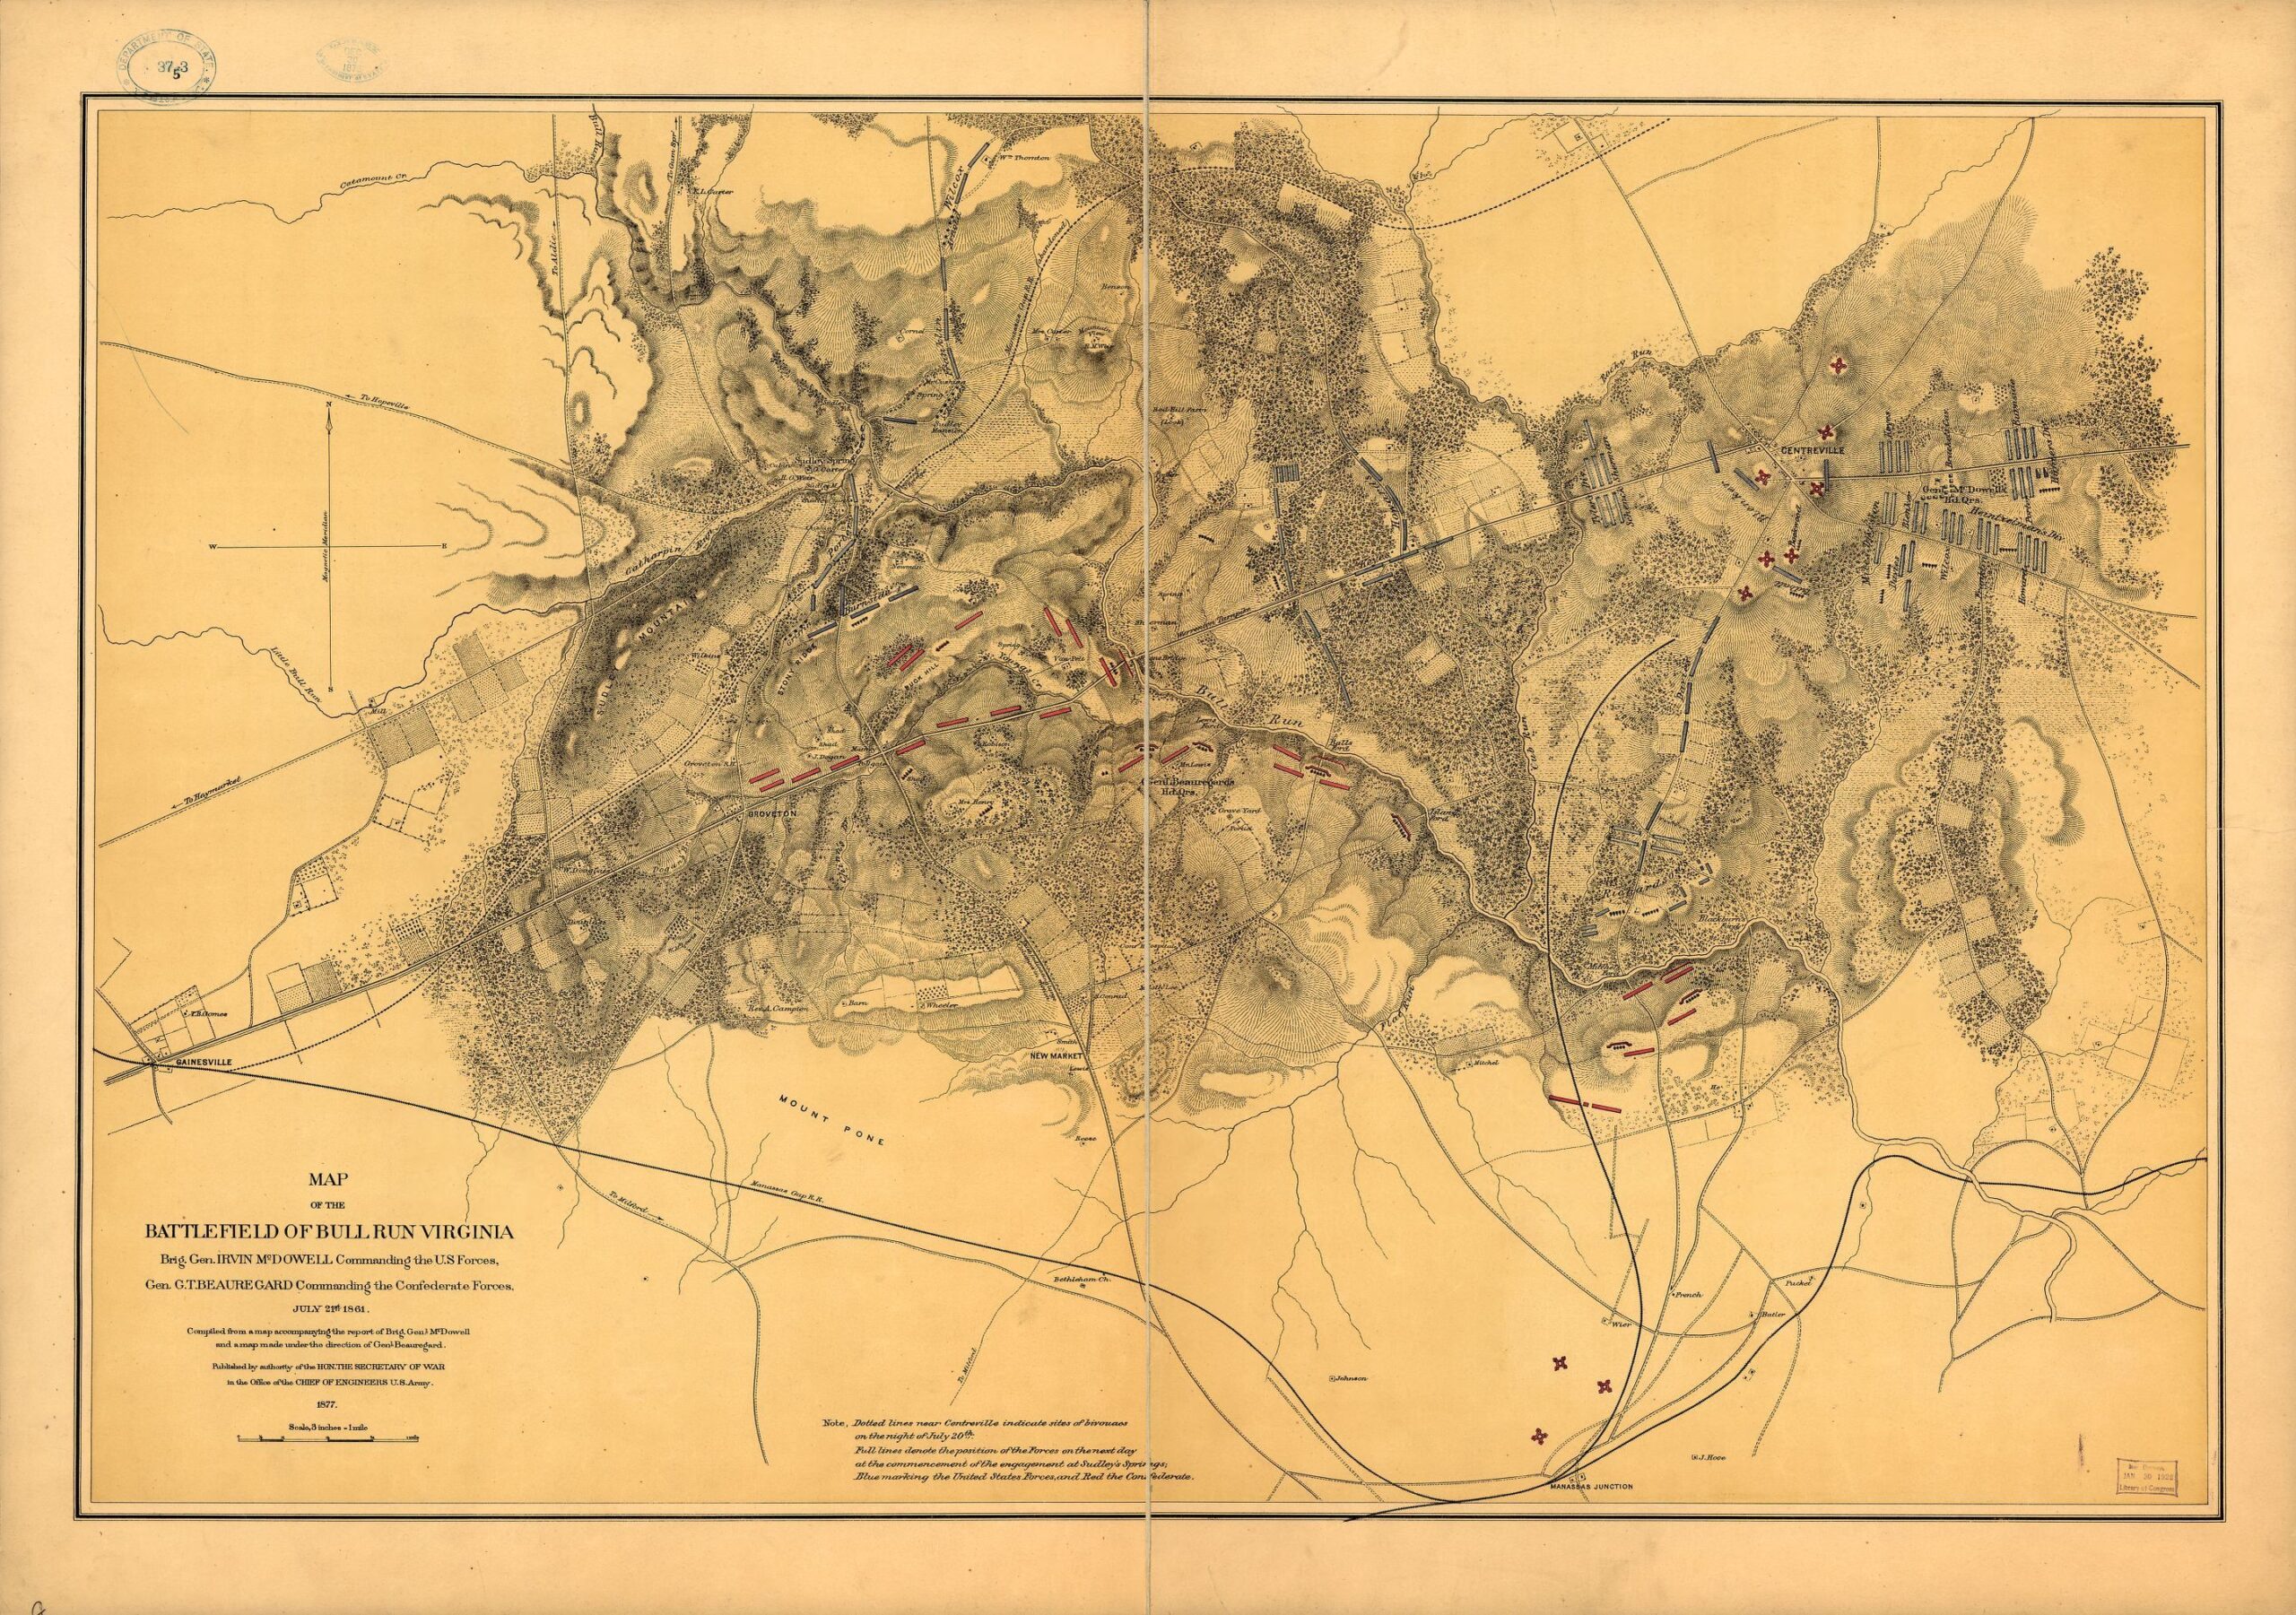
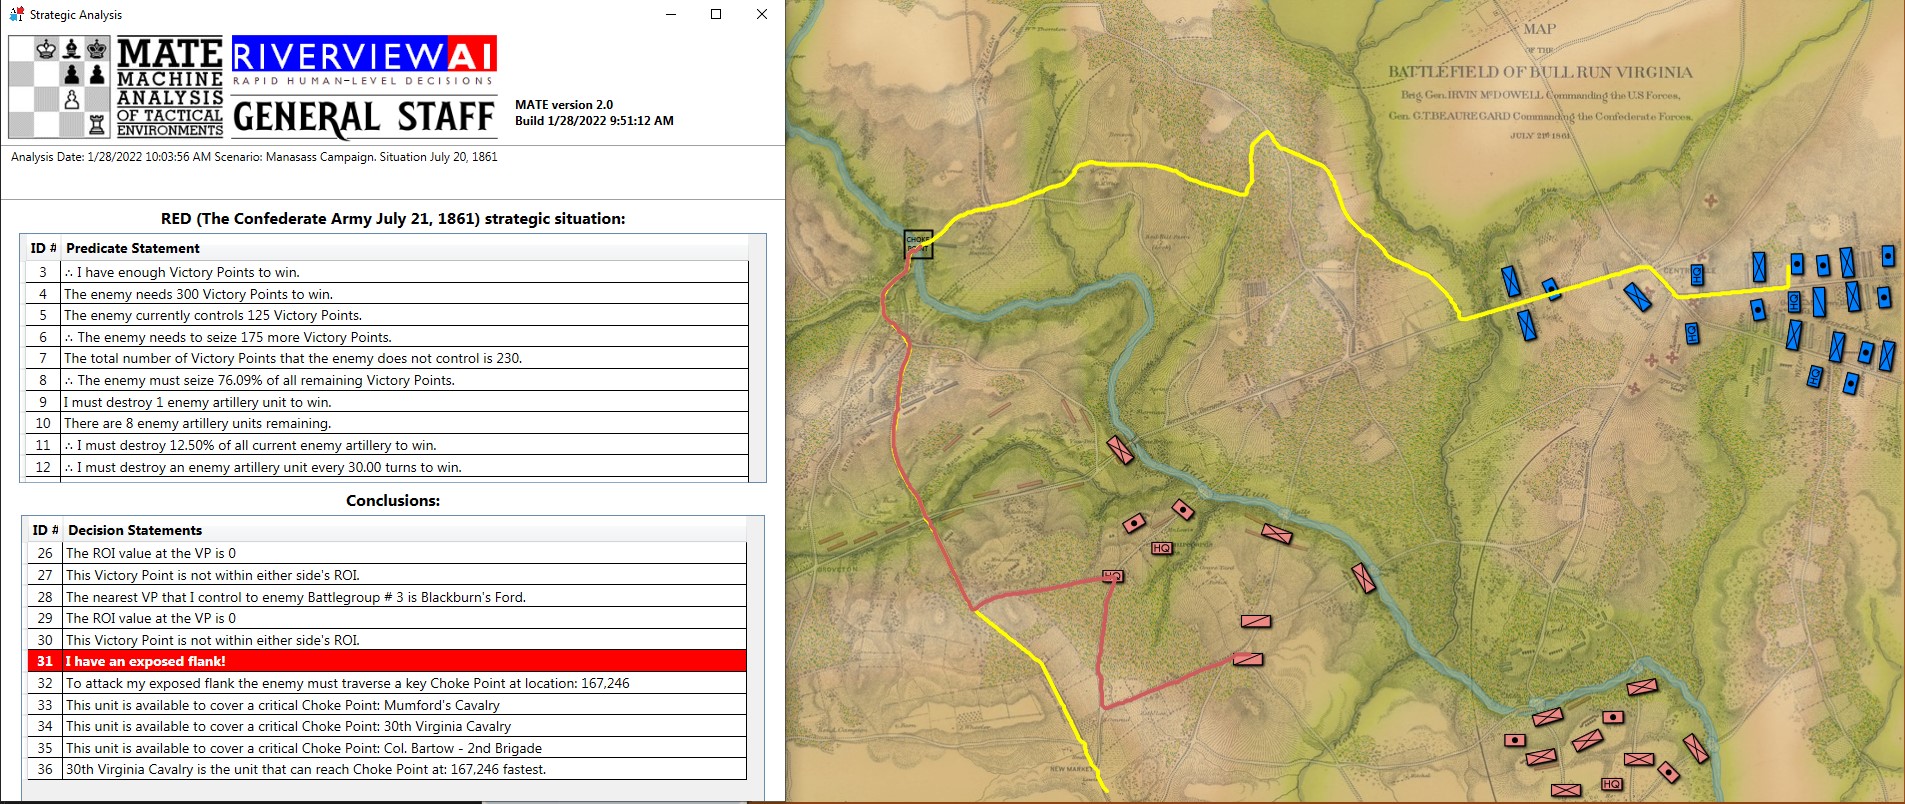
I recently got to experience this again (though this time it was caused by a different data bug) when I was reviewing the AI’s decisions at the battle of Manassas:

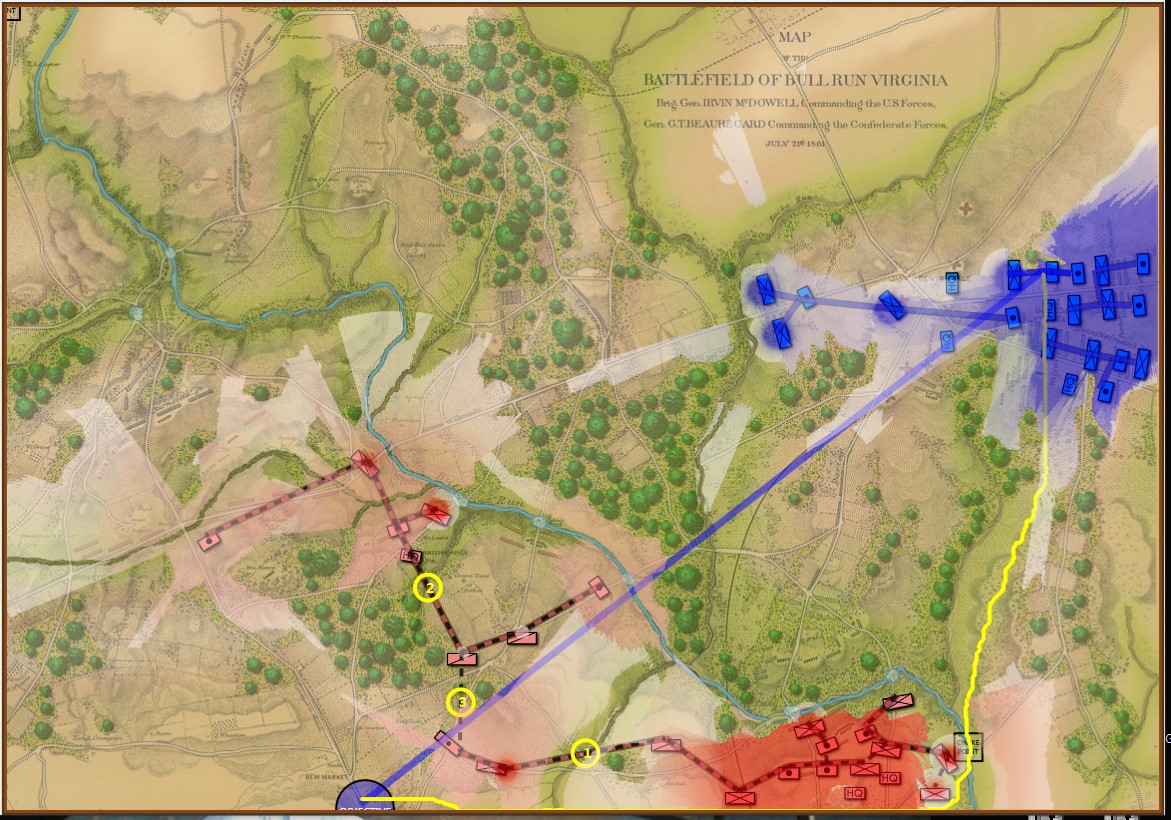
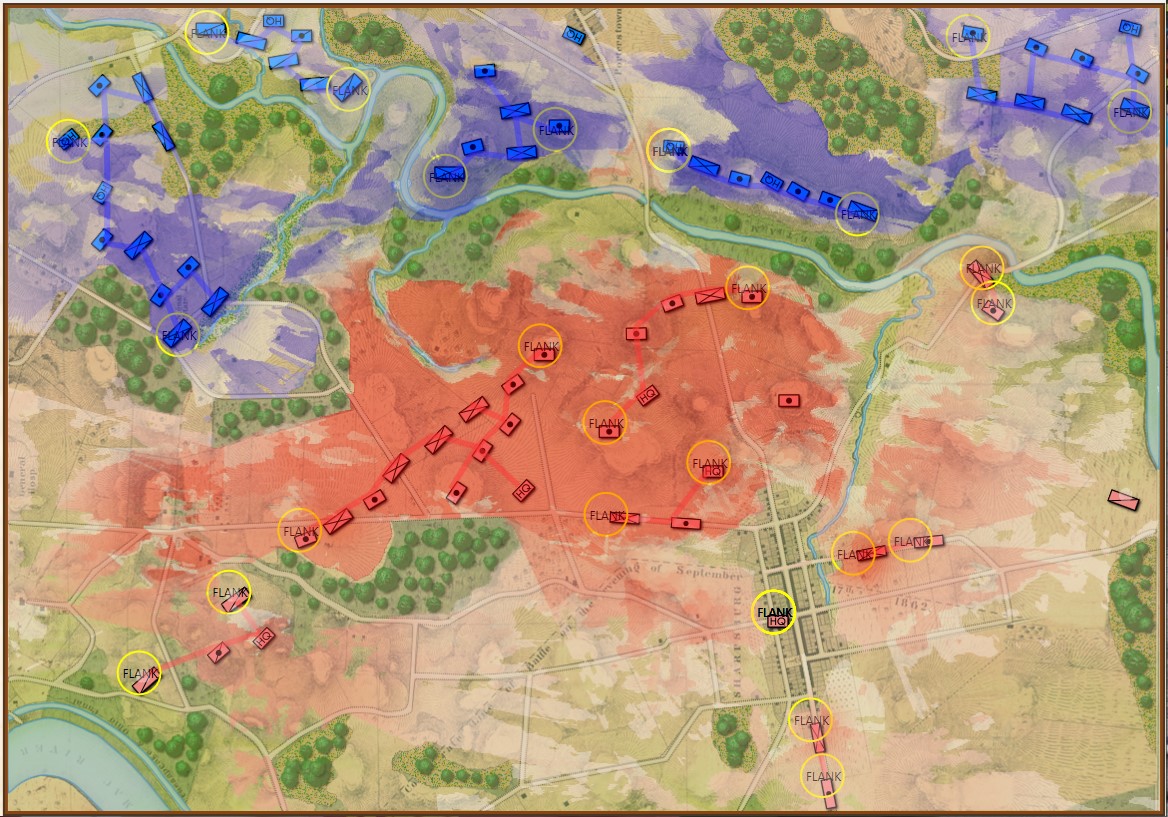
Because the Range of Influence was not calculating the very bottom row the AI found another, perfectly legal, way to reach its goal. Screen shot from the General Staff AI Editor. Click to enlarge.

In this instance, the error in the database was caused by the Range of Influence (basically a map of what red and blue can see and hit) not calculating the very last row. Consequently, the AI was able to legally trace a path from the blue forces in the northeast to their goal at the bottom of the map.

After this bug was corrected the AI performed as expected:

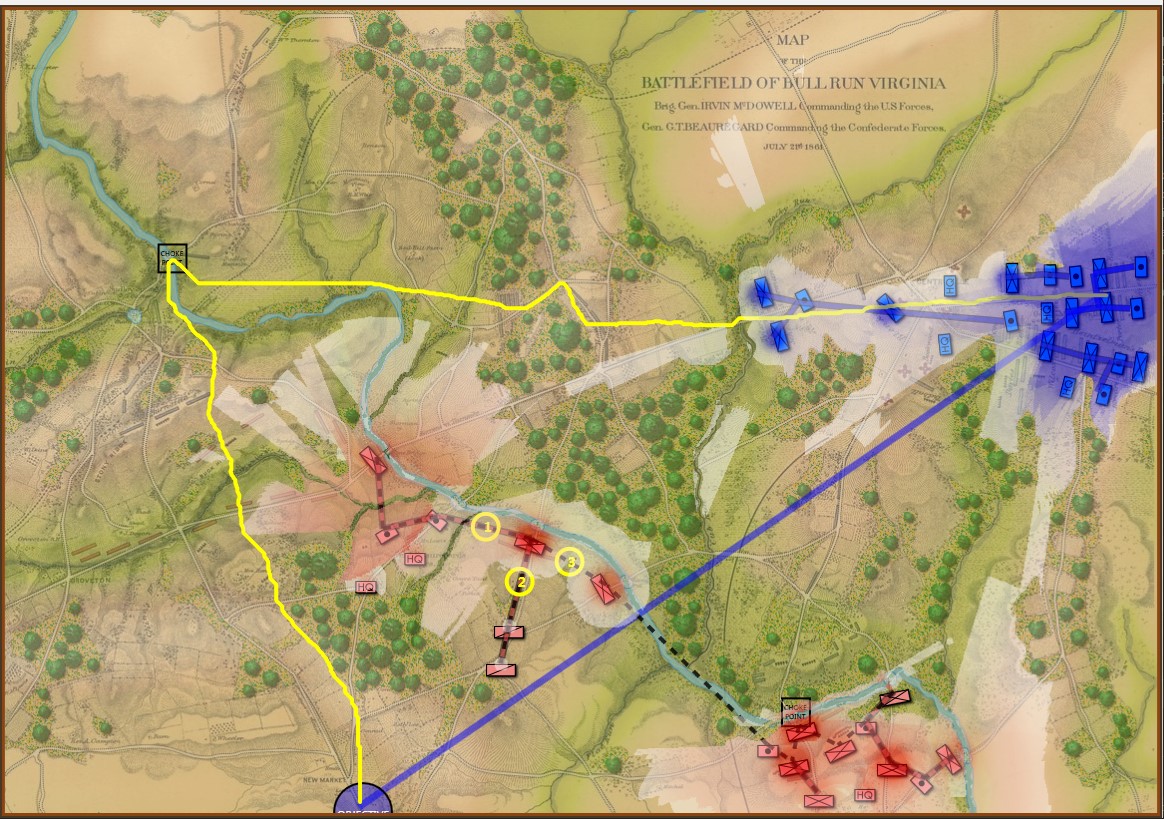
The AI correctly sees going around red’s left flank as the solution to the problem. Screen shot from General Staff AI Engine. Click to enlarge

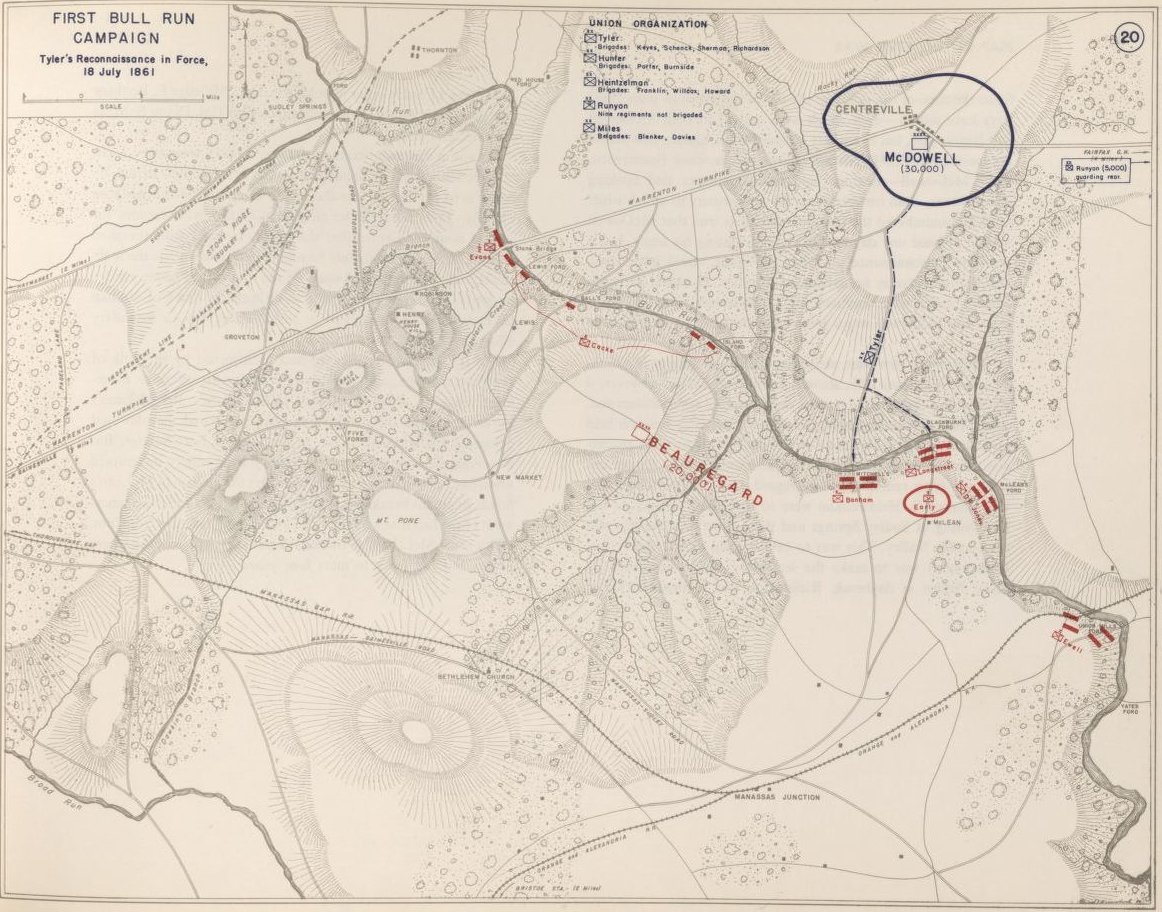
In the above screen shot the AI has demonstrated the correct solution to the tactical problem facing blue at Manassas on July 20, 1861 (the day before the actual battle). Red’s left flank is unanchored. It’s wide open. Note how the AI identifies the one choke point (Sudley Springs Ford) in the plan.

So, the AI surprised me again. I think it’s looking pretty good. When you play against it, watch your flanks.

I Was Wrong About George Washington

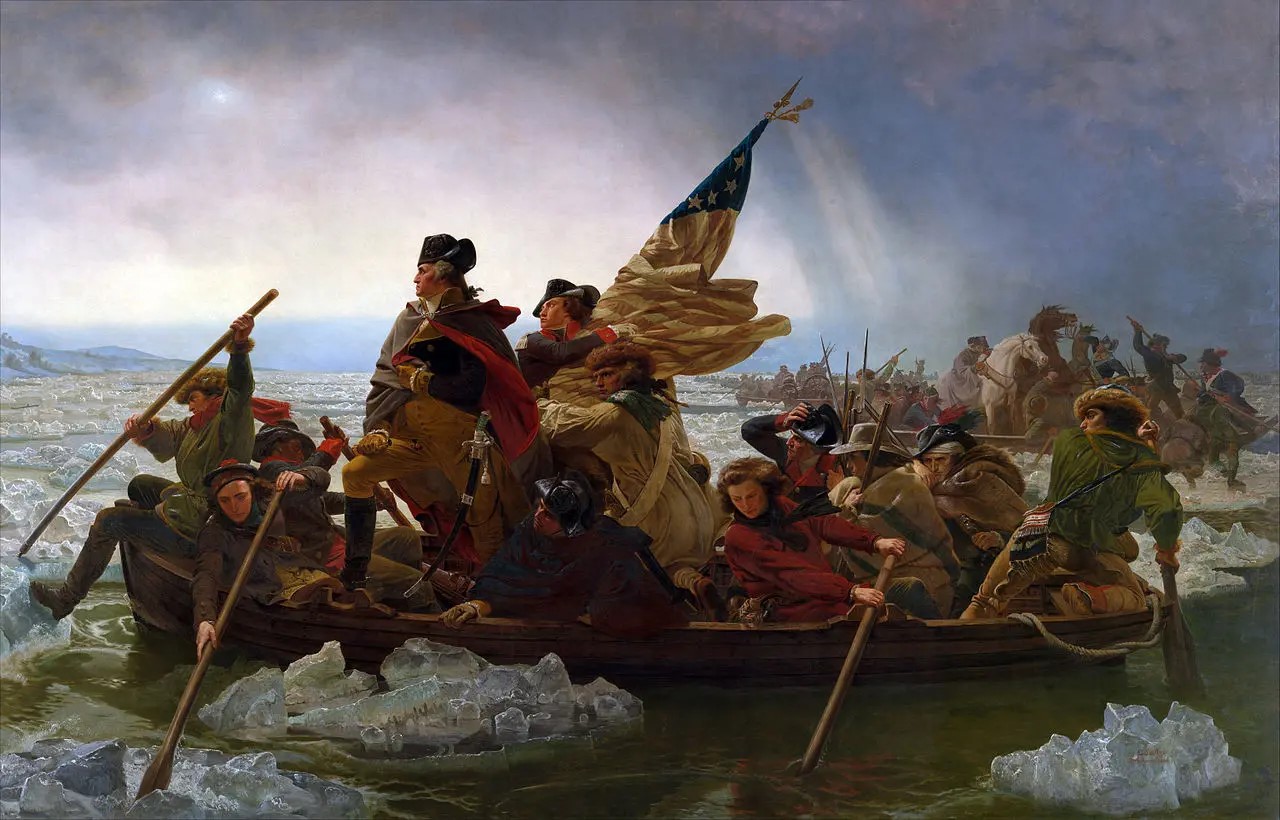
Washington Crossing the Delaware by Emmanuel Luetze. 1851. The Metropolitan Museum of Art. Click to enlarge.

I must confess that I was never much a fan of George Washington’s generalship. Having not studied American Revolution military history I thought that from 1776-1781 the British chased Washington and his sad excuse for an army up and down the eastern seaboard of what was to become the United States until the French Comte de Grasse defeated the British naval forces at the Battle of the Chesapeake and the Comte de Rochambeau at the head of a French army surrounded, besieged and eventually captured, Cornwallis at Yorktown.

To make matters worse, years ago I stumbled upon George Washington’s Expense Account which is, frankly, brutal. Washington turned down the magnanimous salary of $500 a month for being Commander in Chief of the Continental Army famously saying,

“As to pay, Sir, I beg leave to Assure the Congress that as no pecuniary consideration could have temped me to have accepted this Arduous employment (at the expense of my domesttic [sic] ease and happiness) I do not wish to make any Proffit [sic] from it. I will keep an exact Account of my expences. Those I doubt not they will discharge, and that is all I desire.” 1)George Washington’s Expense Account, Washington, George & Kitman, Marvin, page 15

If Washington had accepted the salary he would have been paid $48,000 for five years’ service. Instead, his ‘expences’ came to $449,261.51! This book – and it contains a photocopy of every page of Washington’s Expense Account in fine copperplate handwriting along with a humorous explanation of the expense – is damning. Washington’s very first entry for June, 1775 was for $6,214 (over an entire year’s salary at $500 per month) for “…the purchase of five Horses… to equip me for my journey to the Army at Cambridge – & for the Service I was Then going upon  – having sent my Chariot and Horses back to Virginia.” There are also numerous expenses for cases of the finest wines and plenty of food while at Valley Forge. Not surprisingly, when Washington offered Congress the same terms when he was elected president (no salary just expenses) Congress insisted that he take $25,000 a year; no expenses paid.

Like most Americans, what little knowledge I had of the battle of Trenton can be summed up in Luetze’s famous painting, above: Washington, posed heroically, crossed the Delaware River on Christmas Eve and surprised a garrison of drunken Hessian mercenaries at Trenton capturing them all without a shot. In reality, not much of that is true. Yes, Washington did attack Trenton but it was on the morning of December 26, 1776, and the Hessians weren’t drunk; they fought bravely and their commander, Col. Johann Gottlieb Rall, died leading them.

Then I discovered (from reading David Hackett Fischer’s Pulitzer Prize-winning Washington’s Crossing) that the amazing part of the story wasn’t the battle of Trenton (which really was an extraordinary tale of a small, poorly-equipped, non-professional army making an audacious amphibious crossing of an ice-choked river) but the campaign that followed the victory from December 30, 1776 to January 3, 1777.

The strategic situation in the Princeton / Trenton area, December 29, 1776. Screen shot from the General Staff Scenario Editor. Click to enlarge.

Washington’s forces had made it safely back across the Delaware River after the Trenton raid but he now faced a difficult decision: terms of enlistment were running out for many units in his army and he feared taking the field again in bitter cold with a diminished force. As always, Washington held a council of war. As the senior commanders of the army advised caution a courier arrived informing them that Brigadier General John Cadwalader with his Pennsylvania militia had already crossed the Delaware and was at Crosswicks itching for a fight with the British (this is the blue force at the bottom of the map, above). After more discussion, one group stated, “tho’ they would not have advised the Movement, yet it being done it ought to be supported.”2)Washington’s Crossing, David Hackett Fischer page 266. Eventually, with Washington’s urging, the council voted to support Cadwalader, recross the Delaware and, again, defeat the British in the field.

This was a bold strategy; a defeat of the Continental Army with its back to a river would probably spell the end of the revolution. Washington’s plan was to assemble his forces east of Trenton, in a strong defensive position on ‘good ground’ behind the Assunpink Creek and lure Cornwallis, who was commanding the British and Hessian forces, to attack. This Cornwallis did and was soundly defeated. Washington now moved decisively, sending his forces to capture Prince Town (Princeton) to the north. At the crucial moment in this battle Washington rallied the routed Pennsylvania forces saying, ” ‘Parade with us, my brave fellows! There is but a handful of the enemy, and we will have them directly.’ Washington [then] led his men straight into the center of the battle, within thirty paces of the British line. He was mounted on a white horse, an easy mark for any British soldier.”3)Ibid. page 334

Frankly, I cannot comprehend such bravery. The attack, of course, was a success and the Americans captured Princeton and, perhaps more importantly, demonstrated that their volunteer army would fight, could fight and could win. Washington showed superb strategic and tactical vision throughout these ten crucial days4)See https://tencrucialdays.org/wp-content/uploads/2019/09/eb14b5212fb62dfea8d100f3efd1950f.pdf  for a wonderful series of maps that cover this campaign as well as extraordinary personal courage.

I was wrong about George. Washington.

References

References
1 George Washington’s Expense Account, Washington, George & Kitman, Marvin, page 15
2 Washington’s Crossing, David Hackett Fischer page 266
3 Ibid. page 334
4 See https://tencrucialdays.org/wp-content/uploads/2019/09/eb14b5212fb62dfea8d100f3efd1950f.pdf  for a wonderful series of maps that cover this campaign

Layers: Why a Military Simulation Is Like a Parfait

Detailed military simulations and wargames are made up of layers1)Here is the obligatory link to Shrek and the layers, onions and parfait bit. by necessity. Layers keep simulation designers and users from being overwhelmed by oceans of data. In General Staff every scenario (battle) is made up of these layers (some are optional):

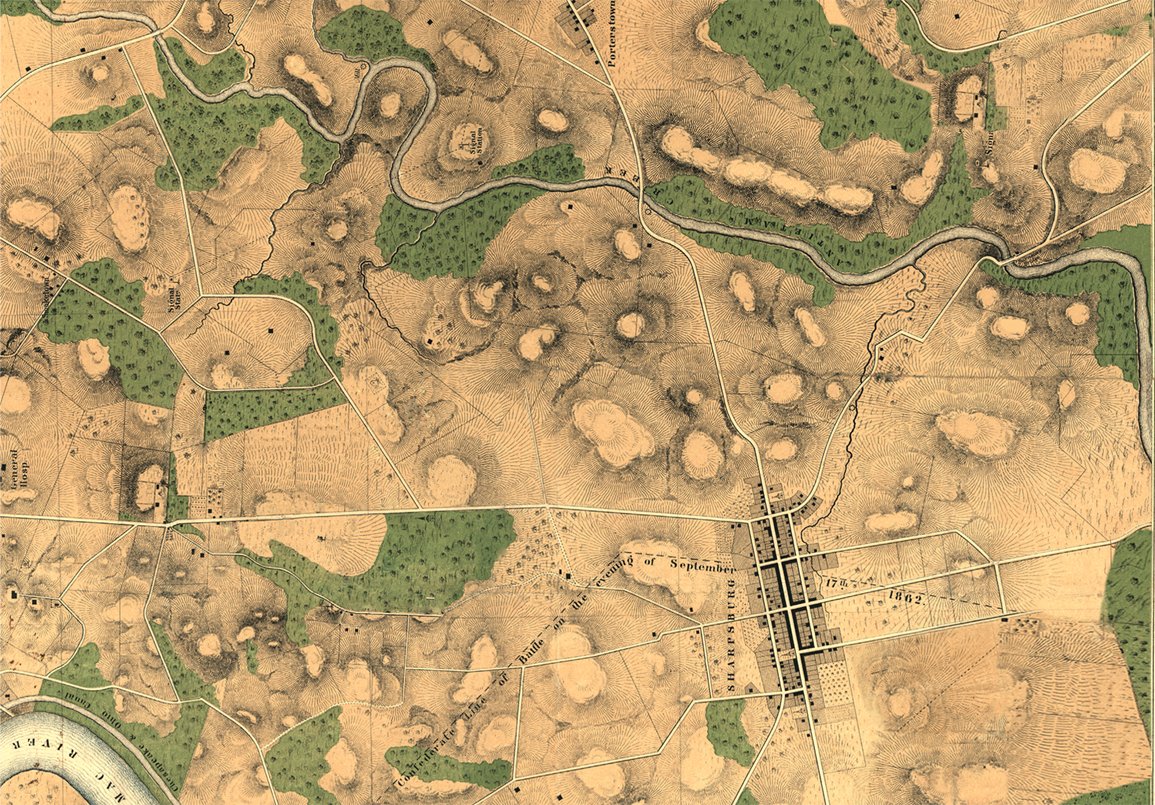
The Background Image. Ironically named because even though it’s underneath all the other layers it’s makes up most of what the user sees of the battlefield. However, the background image contains no data that is actually used by the computer; it is completely ‘eye candy’ for the user. That said, us humans get most of our data from looking at this map (we can make sense of the hills, roads, forests, rivers, etc.). But that’s not how computer vision works (see below).

The Background Image for the Antietam scenarios. Click to enlarge.

This map came from the Library of Congress (here). The Library of Congress is a great place to get royalty-free battlefield maps from American history. Personally, it’s exactly these old maps that inspired me to create General Staff. There is, however, one problem: these old maps are just not ‘GPS accurate’. That is to say, even though the General Staff Map Editor allows the user to directly import Google Maps elevation data, it won’t align properly with maps made over a hundred years ago without GPS data. That means the scenario designer will have to enter the elevation data by hand and not import it from satellite data.

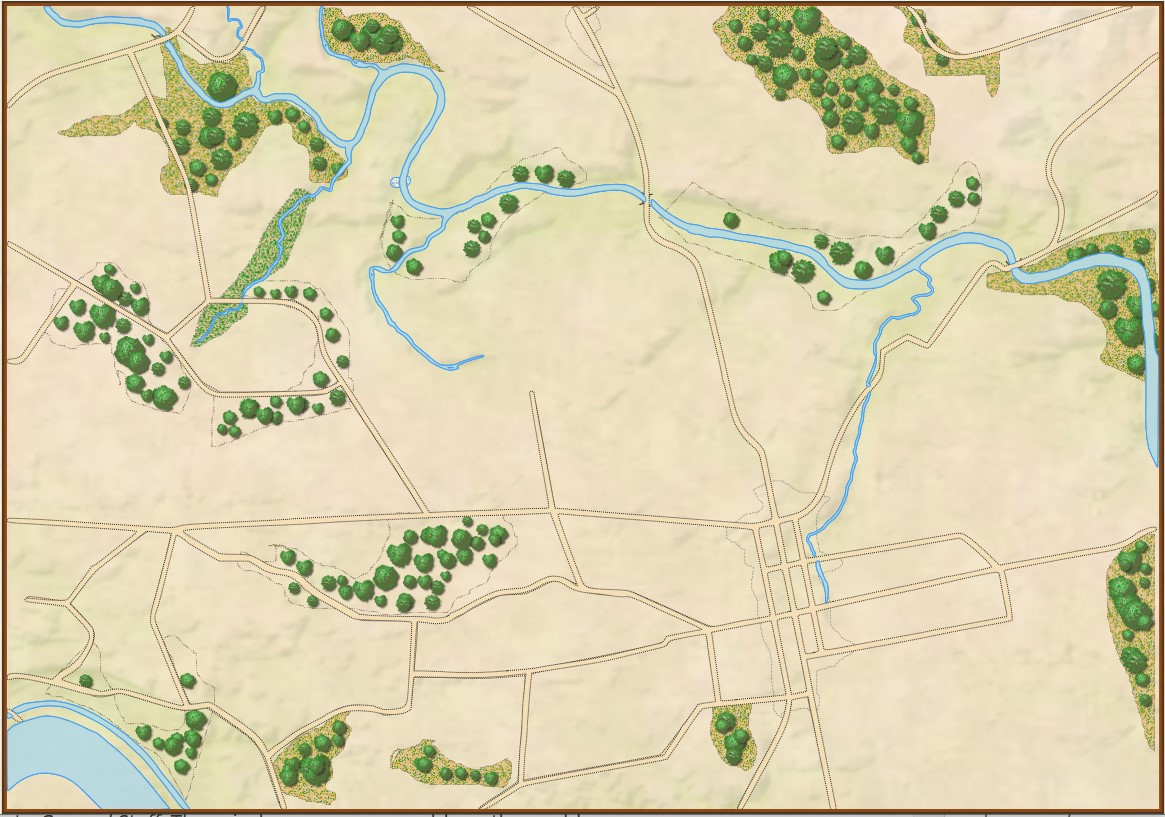
The Terrain Layer. This layer is a visual display of what the computer ‘sees’ of the terrain: forests, water, fences, hedges, walls, swamp, mud, field, city, road, river, fortification, buildings (seven kinds), fords, and bridges.

The terrain layer for Antietam. Click to enlarge.

The Terrain Drawing tab (right). This is one of the tabs in the General Staff Map Editor (click here to go to the online Wiki for more detailed information). Click on the desired terrain type and then draw with either the mouse or a digitizing tablet and pen. I have absolutely no drawing abilities, but I’ve watched actual artists create a map using a digitizing tablet and pen in about 30 minutes. If you’re drawing a river, the harder you press with the digital pen the wider the river gets.

There are three ways you can input water and roads in the Map Editor: mouse, digitizing tablet and XAML code. For me, because I have very limited drawing abilities, I find using XAML code the easiest (below):

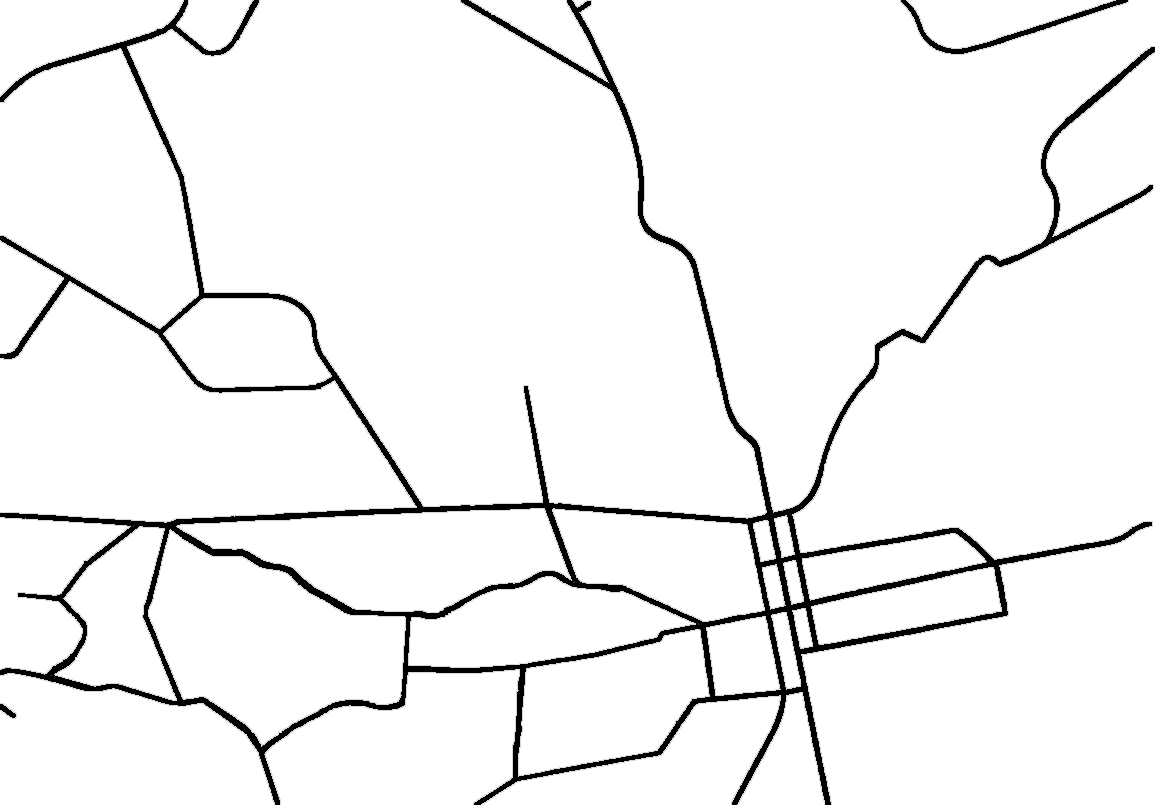
The Road Net Layer (optional). This image (below) was created in a paint program (PhotoShop, though any paint program that you’re comfortable with will work just fine). It was then imported into Inkscape (free download here) and exported as XAML.

The road net at Antietam. Click to enlarge.

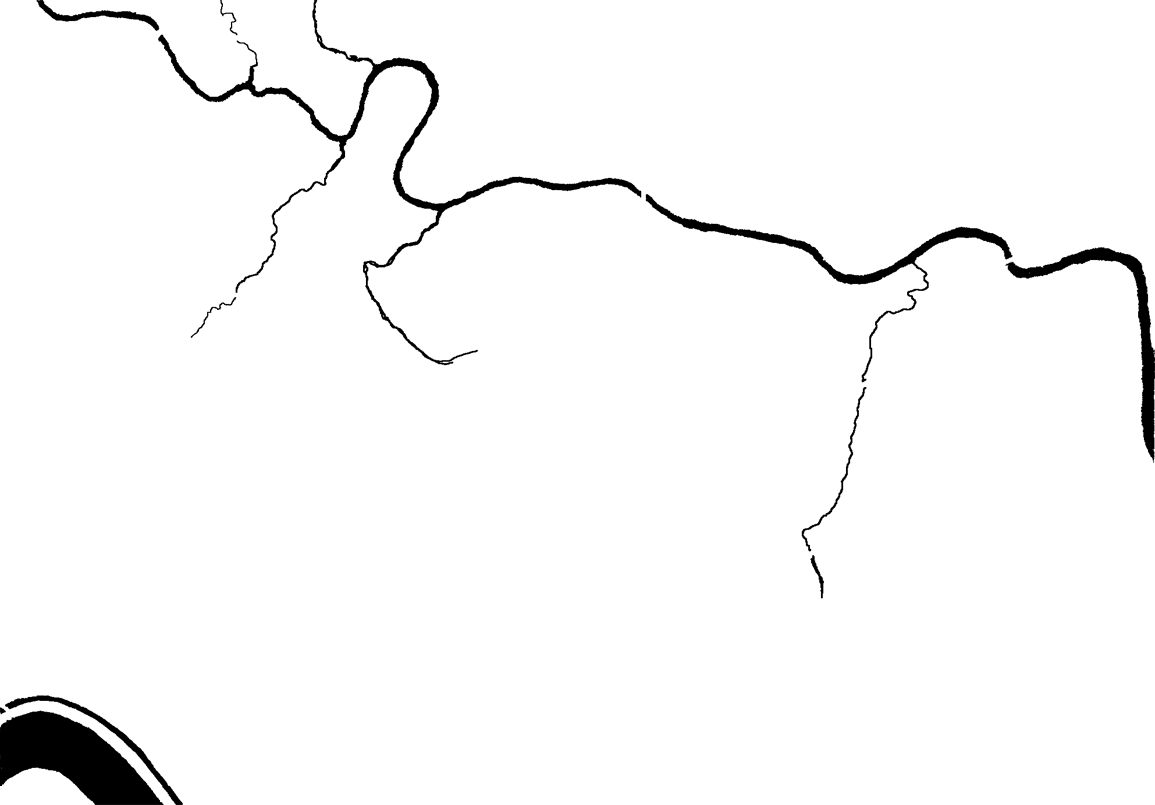
The Water Layer (optional). Like the Road Net image (above) this was created in a paint program (PhotoShop). It was then imported into Inkscape (free download here) and exported as XAML.

Antietam water map. Click to enlarge.

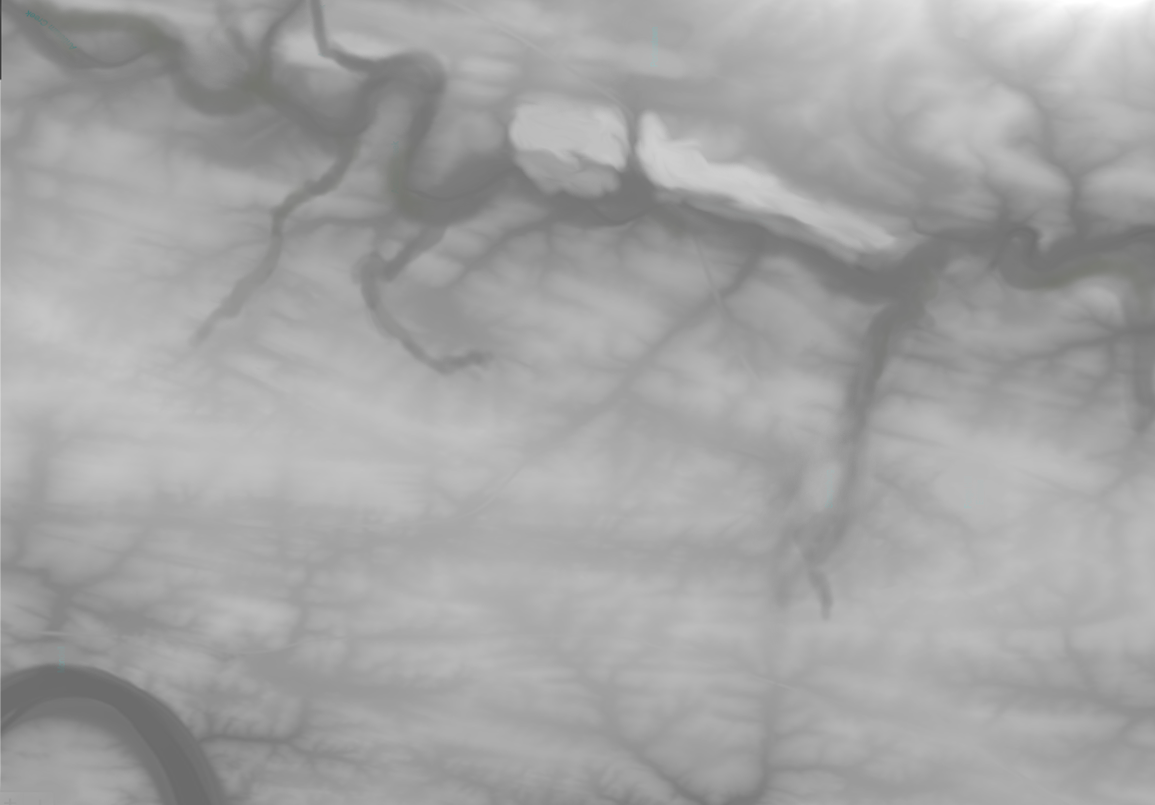
The Elevation Layer. There are four ways to input elevation in the General Staff Map Editor: you can draw with the mouse, use a digitizing tablet and pen, input elevation data directly using Google Earth and directly importing a BMP image.

Antietam height map. Click to enlarge.

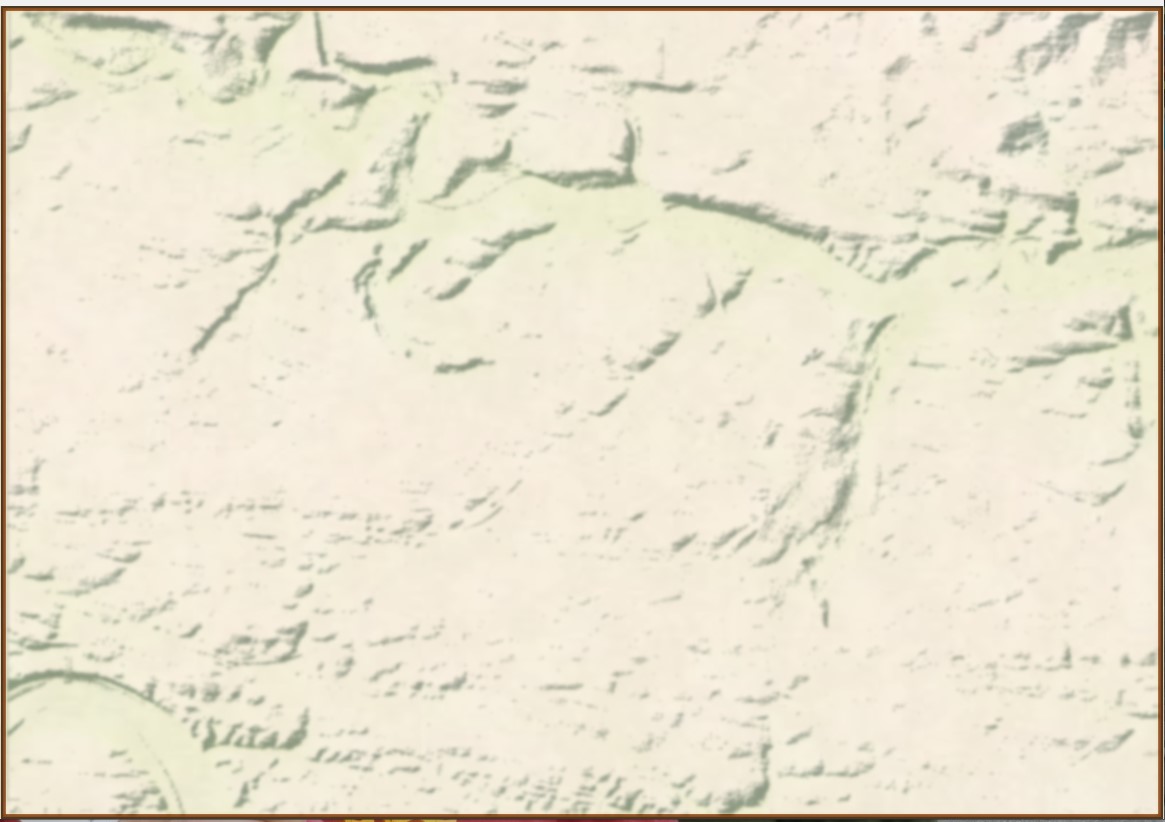
The Slope Layer. This layer shows the extrapolation of slopes from the elevation layer (above). Combined with the Background, and Elevation layer it can produce a dramatic 3D effect. See Trenton, below.

The Slope Layer for Antietam. Click to enlarge.

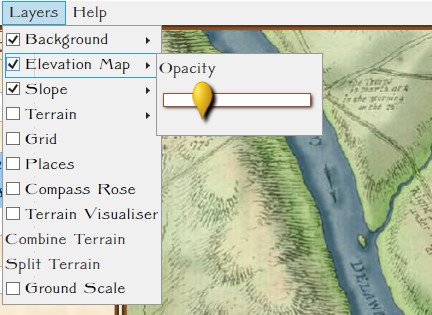
Blending Multiple Layers. This is a blend of the Background, Elevation, Terrain and Slope layers. The user can set the blend values (see screen shot from the Map Editor, right).


Antietam with background, elevation, slope and terrain blended. Click to enlarge.

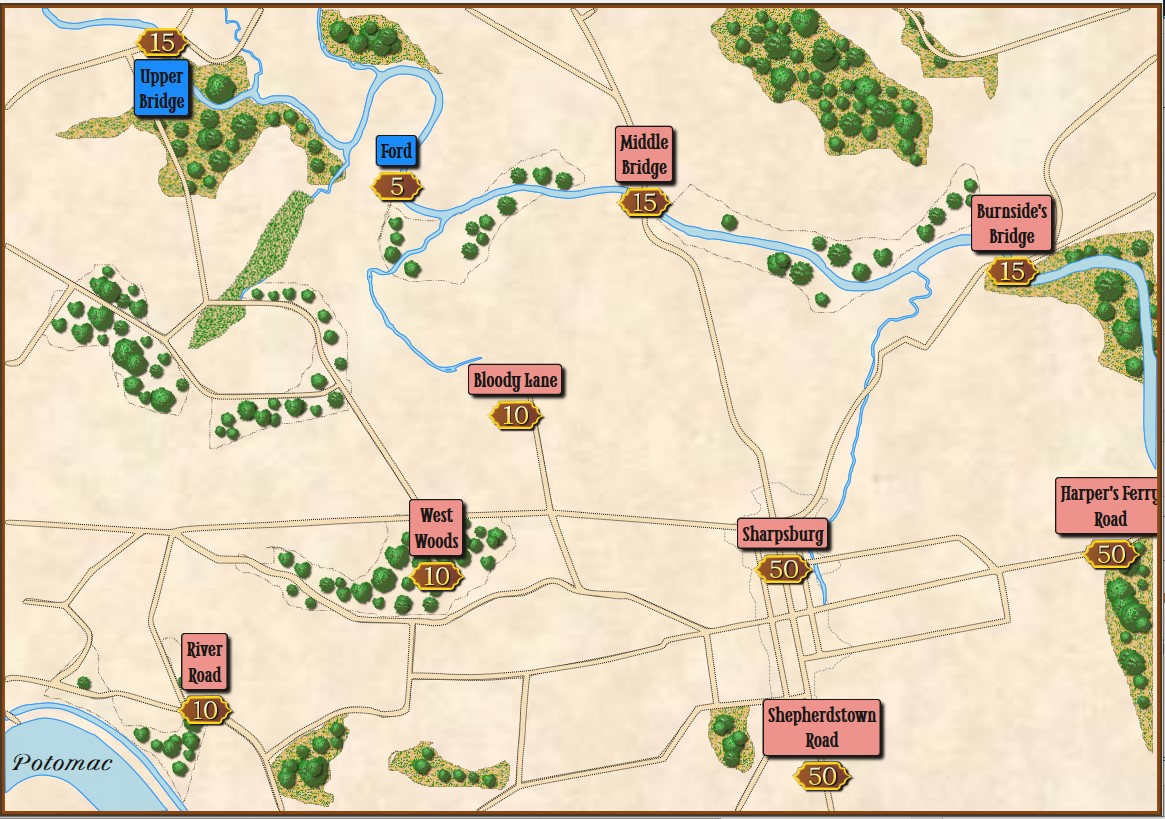
The Places and Victory Points Layer. This layer allows you to set certain locations as Victory Points or Placenames. A Placename is a descriptive text placed on the map that has no importance to the simulation; e.g. labeling the Potomac River (below).

The Victory Point and Placenames Layer. Click to enlarge

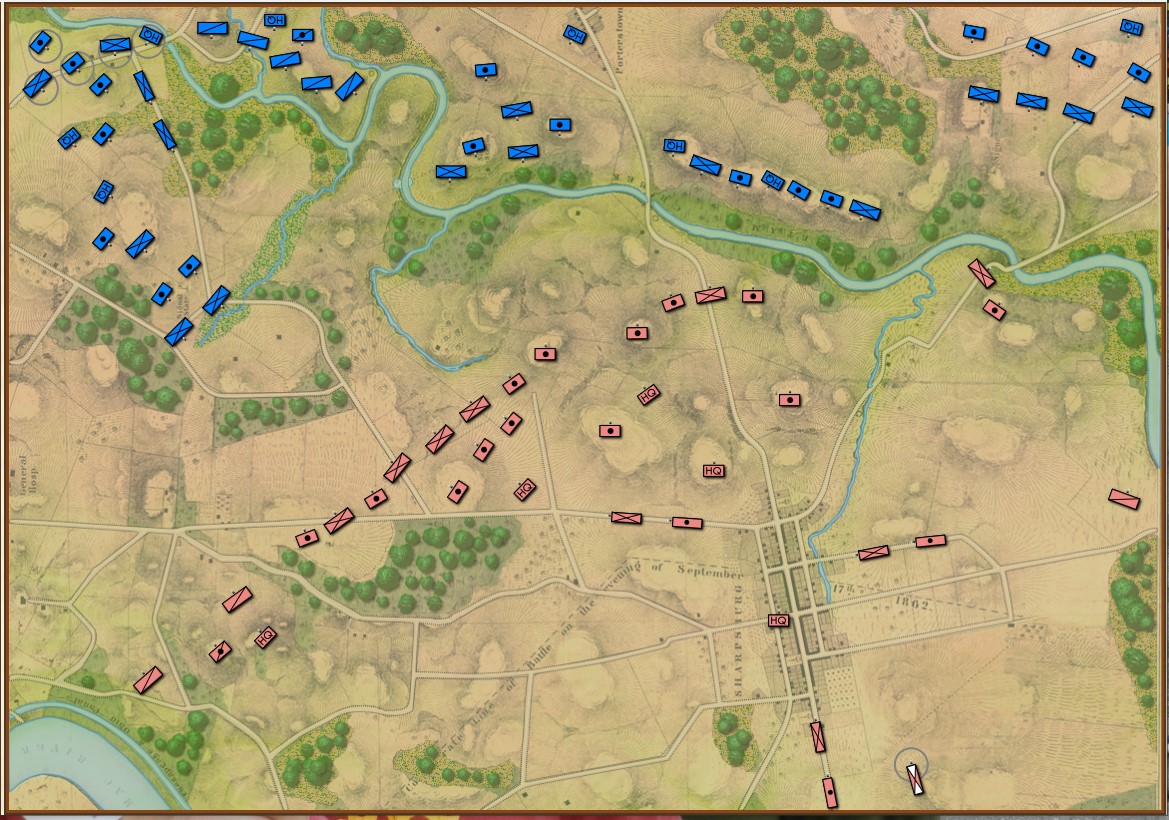
The Units Layer. This is a visual representation of the current simulation state showing unit locations. This information may be filtered by Fog of War (FoW) and what units can observe other units (both friend and foe) using 3D LOS (see below):

The Units layer for Antietam. Note: reinforcements are displayed on this layer even though they won’t enter the scenario until later. This screen shot was taken from the Scenario Editor. Click to enlarge.

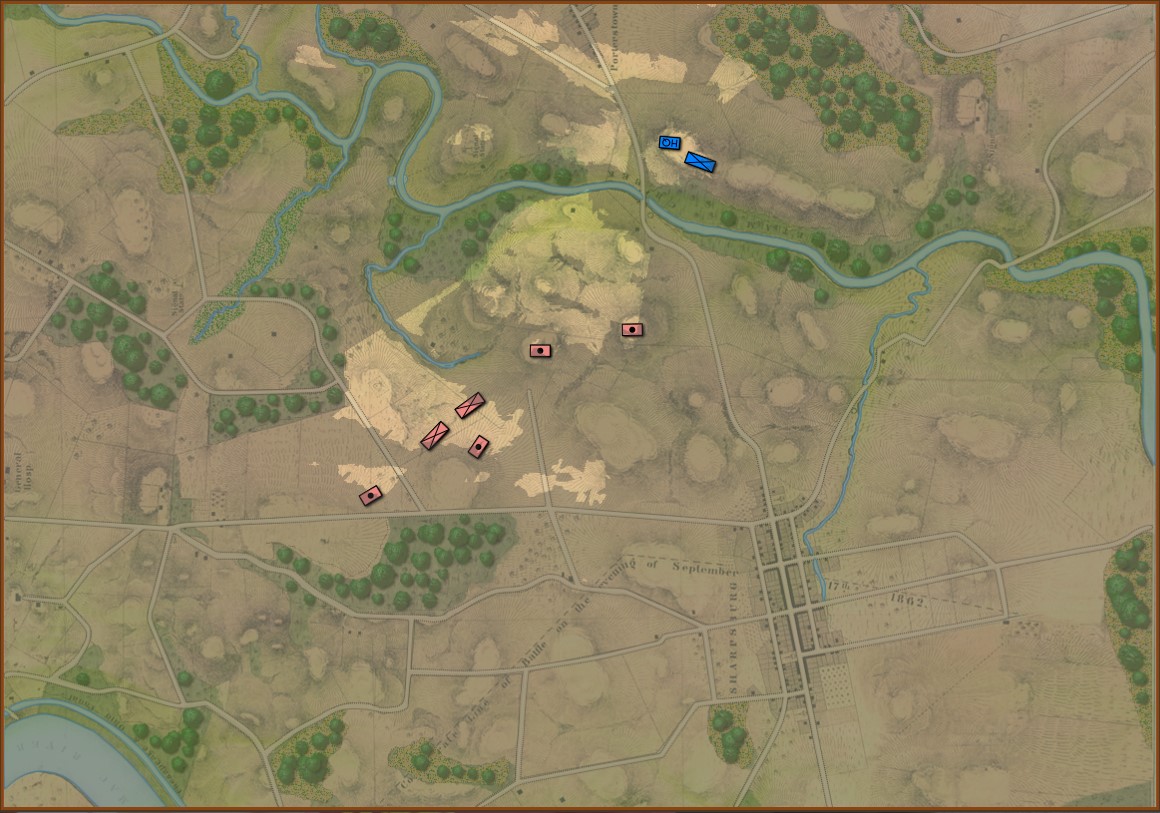
The Fog of War Layer. This layer is a visual representation of what can be observed from any point on the battlefield; in this case, the 3D LOS view from the Pry House (McClellan’s Headquarters at Antietam).

Antietam with complete Fog of War displayed for McClellan’s HQ at the Pry House. Click to enlarge.

The AI Layer. This layer is a visual representation of the output of a number of AI algorithms including Range of Influence (ROI), battle groups, and flank units. This is how the AI ‘sees’ the battlefield.

The AI Layer displays Red and Blue Range of Influence. Click to enlarge.

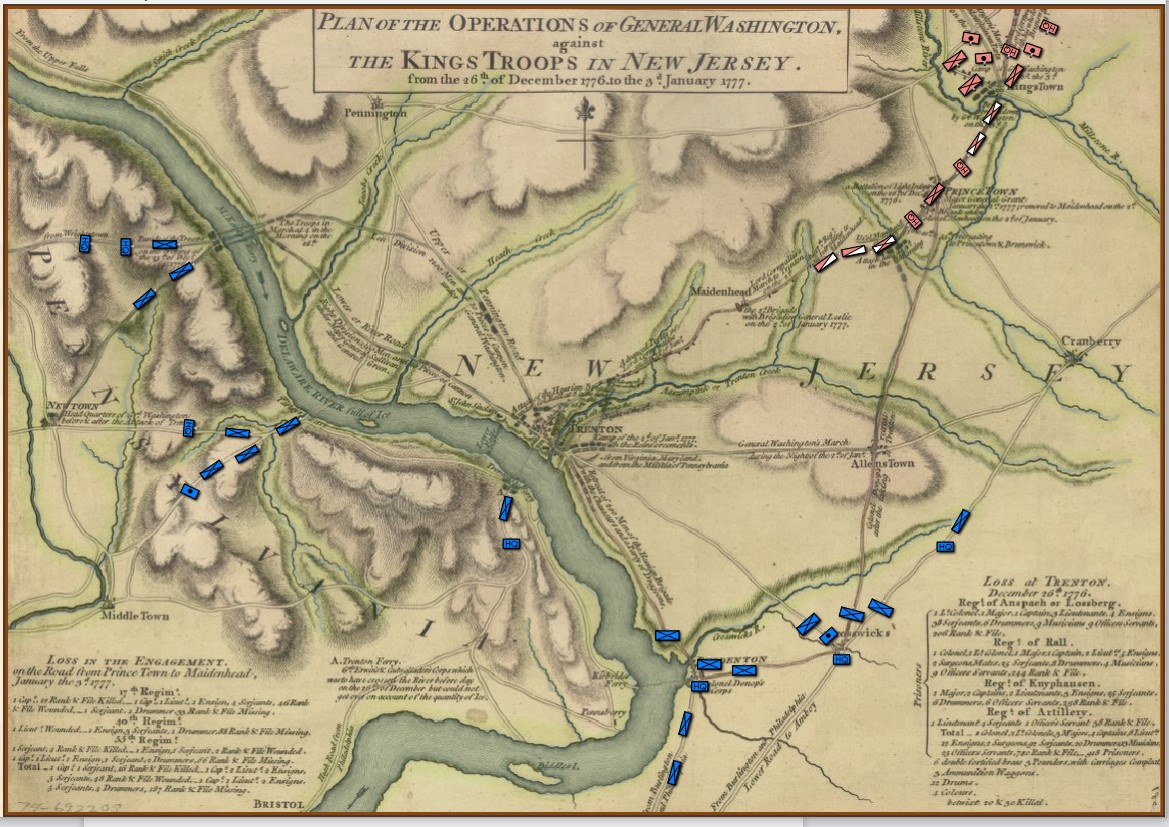
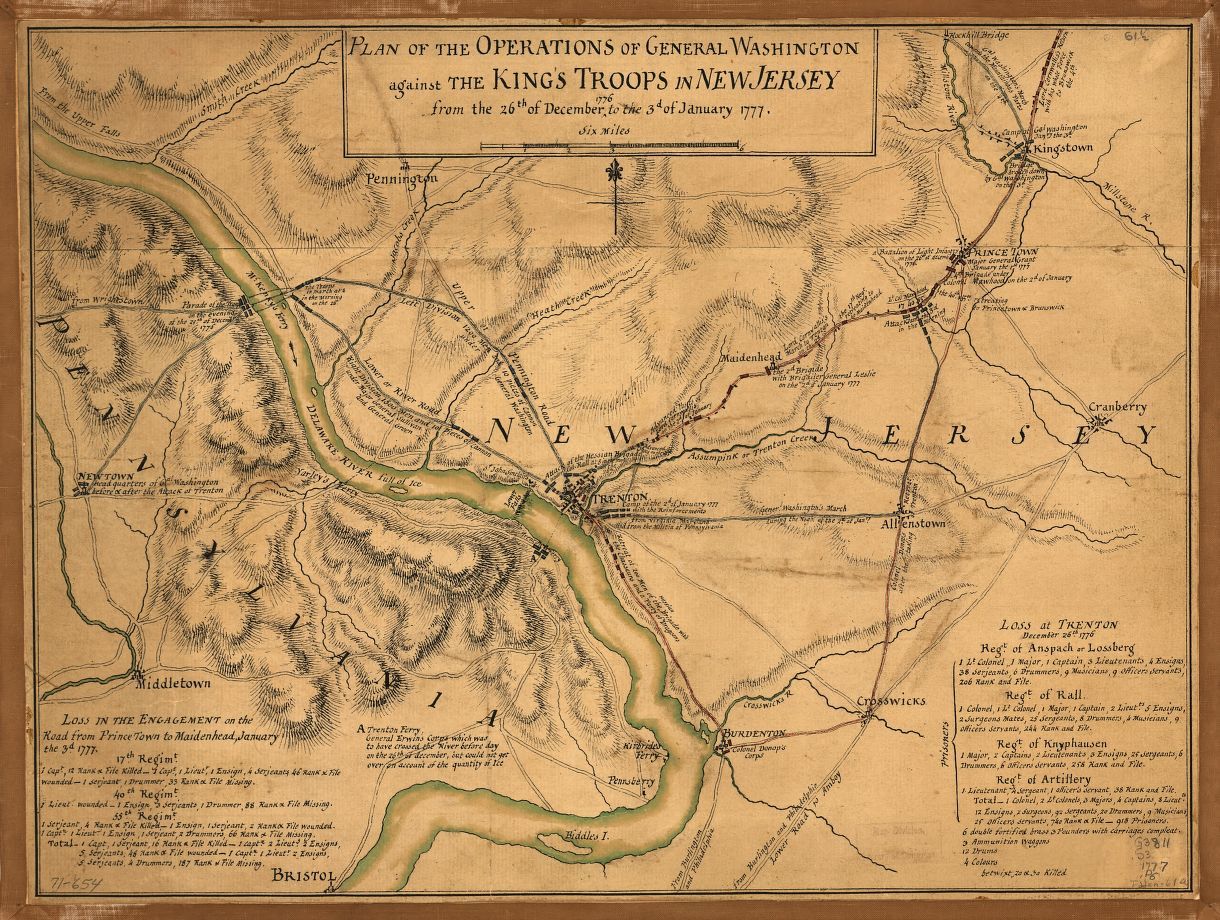
Trenton. I recently began working on a Trenton scenario. One of the best places to begin a search for a contemporary map of an American battle is the US Library of Congress. That is where I found the extraordinary campaign map for Trenton published in 1777.

From the US Library of Congress (published 1777, London). Click on the map to go to source.

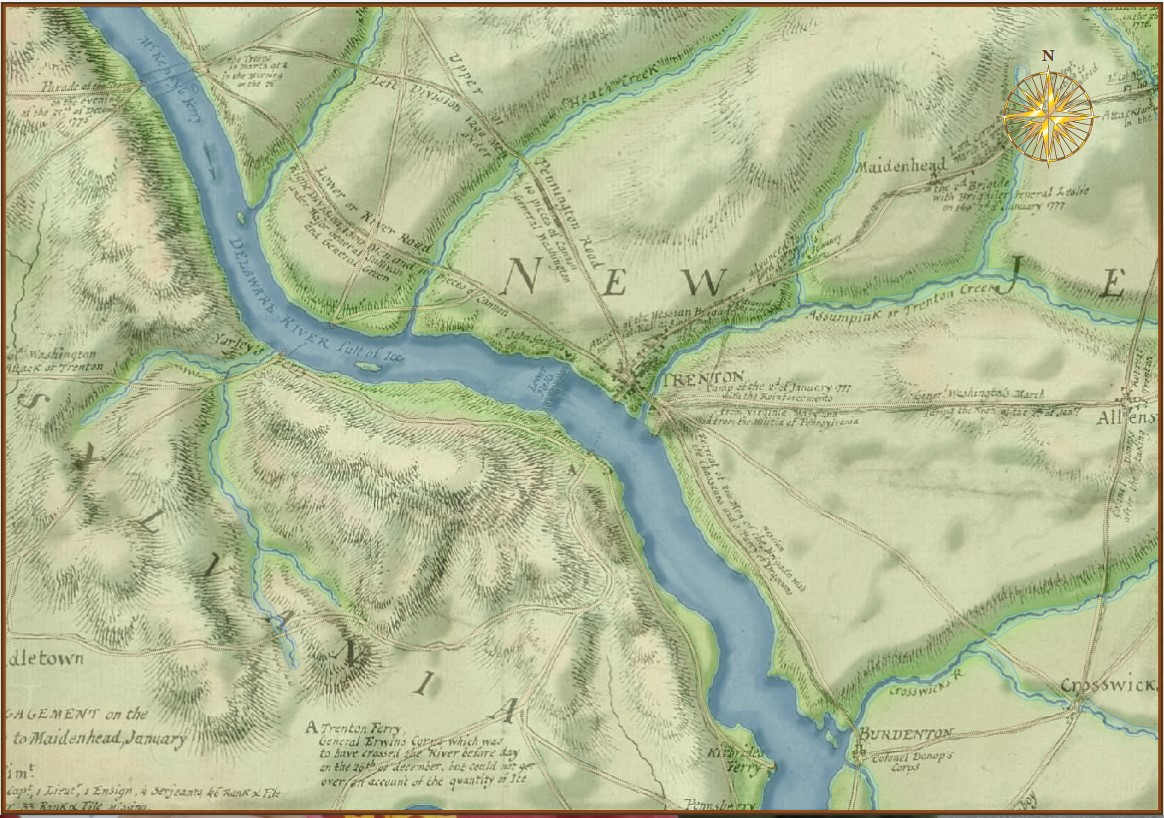
From the above original map, Ed Kuhrt created an elevation or height map (see above) in PhotoShop. From that Elevation Layer we extrapolated the slopes and displayed them using an algorithm created by Andy O’Neill. When blended together the result is striking:

Screen shot of the Trenton map in the General Staff Map Editor. Note how the blending of the slope layer with the elevation and original background create a 3D effect. Click to enlarge.

References

References
1 Here is the obligatory link to Shrek and the layers, onions and parfait bit.

Wargames, Slopes & the High Ground

Rules for how slopes effect attack and defense from Avalon Hill’s Gettysburg (1960 edition). Author’s collection. Click to enlarge.

One of the first rules that we all learned when we began to play wargames (at least this was true of early Avalon Hill games for me way back in the 1960s) was that if the defending unit was on a hill and the attacking unit was on the slope, the defender’s ‘defense factor’ was doubled. Under some circumstances, a defending unit could even have its defense factor tripled (see right). And, yes, there were situations (see below) where an enfilading attacking unit could negate the defenders 2:1 advantage.  For my entire wargaming life – over fifty years now – this basic rule of thumb applied: a unit on a hill was twice as strong, defensively, than it would be on the plains below.  I’ve used this ‘defensive factor multiplier’ in every wargame I’ve designed going back to UMS in the 1980s. I never gave  it a second’s thought. Until now.

Detail of rules from Avalon Hill’s Waterloo (1962) showing when a defender’s strength is doubled on a hill and when the effect is negated.

General Staff has no concept of “defense factor.” Think about it, what is a ‘defensive factor’? It seems to act like armor of some sort. It certainly is a valid concept in naval warfare or armored warfare or jousting, but it doesn’t apply in 18th and 19th century warfare that General Staff: Black Powder is designed to simulate. Instead, units in General Staff are weapons platforms. Units project firepower which result in casualties. Indeed, all combat resolution boils down to this equation: How many casualties did this unit inflict on that unit?

Since there is no ‘defensive factor’ to multiply by two for being on a hill defending against an attacker climbing a slope, how or what does General Staff multiply or divide? What is the source for the 2:1 defense factor multiplier for having the high ground? These were the questions that I recently investigated.

It turns out there has been very little research done on the subject of military movement on slopes of various degrees, and the effect of angle of slope on defending a position against a unit attacking up slope.  Yes, the U. S. Army has published this on foot marches and slopes but it doesn’t cover 19th century cavalry, artillery, horse artillery, etc.).1)I contacted respected military historian and researcher Brent Nosworthy who wrote back, “The effects of slopes on the speed of movement and the cohesion of troops is a very interesting question indeed. I am enclosing a rough draft of a chapter from The Metrics of War booklet I was working on last year. I think here and there is some information as to how it affected beast of burden’s ability to draw artillery. There were several articles about defending and attacking heights in Rider, John (Editor); British Military Library: A Complete Body of Military Knowledge; second edition, 2 volumes, London, 1798-1801. I cannot remember if there were specific references to these issues in these articles. I also recommend if you have not already consulted: Tielke, Johann Gottlieb, The field engineer; or instructions upon every branch of field fortification: … with plans and explanatory notes. Translated from the fourth … London, 2 volumes, 1789. Russell, John (Lieutenant – 96th Regiment of Foot); A Series of Military Experiments of Attack and Defence, Made in Hyde-Park, in 1802, London, 1806. Adye, Ralph Willet; The Bombardier, and Pocket Gunner, Second Edition, London, 1802. However, I am not certain they contain any references to the effect of the angle of slope on speed and cohesion.”

What I was looking for was a table that cross-indexed angle of slope with its effect on attack, defense and movement. What I found was Table D, (below) from the rules for Charles Totten’s Strategos: The Advanced Game. on the Grogheads.com site:

From. “Charles Totten’s Strategos: The Advanced Game.” found at Grogheads.com. Published in 1890.

What this chart shows is:

  • Unit types respond differently to moving up or down different slopes; e.g. no artillery can ascend a slope greater than 15°, no cavalry can descend a slope greater than 30°, and infantry can only ascend slopes of greater than 30° in skirmish formation.
  • Having superior elevation does not impart any defensive advantage by itself.
  • Having superior elevation on a steep slope can actually be a defensive disadvantage; e.g. artillery cannot fire down a 15° slope, and cavalry cannot charge down slopes greater than 15°.
  • Units firing uphill have increasingly less effect as the angle of slope increases; e.g. infantry has limited or no effect firing uphill at greater than a 20° slope, cavalry cannot charge up a slope greater than 15°, and artillery has no effect when firing up a slope greater 15°. Indeed, this is where the the traditional defensive advantage of holding the high ground derives from: defensive fire is not more effective, rather offensive fire is much less effective when attacking uphill.

If we look at two battles of the American Civil War that are known for assaults up steep slopes (Fredericksburg, December 13, 1862 and Missionary Ridge, November 23, 1863) we find that the values in Table D, above, are largely validated.

Detail of map of Missionary Ridge from the Library of Congress. The crest of the ridge is about 275 feet above the plain below. In numerous places, the slope is greater than 20°.

The story of the successful Union attack on Missionary Ridge is legendary: Union forces originally assigned to capture the rifle pits at the base of the ridge pushed up the slope without orders, primarily to escape defensive fire from above. They scaled the ridge in a loose, skirmish formation, not firing until they reached the crest.

As we can see from the above map the slope of the Union attack up Missionary Ridge is, at points, greater than 20°. In Brent Nosworthy’s, Roll Call to Destiny: The Soldier’s Eye View of Civil War Battles he writes (page 250), “One of the most notable characteristics of this engagement was the relatively light number of casualties suffered by Van Derveer’s attack force, even though it had to break through two sets of fieldworks.” “To the untrained eye looking at the defenses way up on Missionary Ridge… the Confederate position must have appeared impressive, possibly impregnable, and if not impregnable, then capturable only after the expenditure of many lives. This was the opinion of the Confederate commanders who had chosen to defend the position. (page 252)” “Unfortunately for the Confederates, the military reality was quite the opposite. A high ridge immediately above a steep gradient is one of the worst imaginable defensive positions, about equivalent to placing one’s forces in a line with their back to a river and no avenue of retreat. (page 253). ”

This map of Fredericksburg from the Library of Congress (1931) shows a 90 foot rise in elevation above the plain for Marye’s Heights.

Union forces attacking up the gentler slope at Fredericksburg were not so fortunate. Except in a few steep places that offered shelter from Confederate artillery most of the Union attack was under constant fire. Quoting from Nosworthy’s Roll Call to Destiny (page 129), “a British artist on assignment for the Illustrated London News would recall the effect of the artillery fire on the advancing  Union lines: ‘I could see the grape, shell, and canister from the guns of the Washington Artillery mow great avenues in the masses of Federal troops rushing to the assault.'”

Nosworthy, in, The Bloody Crucible of Courage: Fighting Methods and Combat Experience of the Civil War, writes (422-3), “It had long been a general maxim that artillery should only be placed at the top of a slope which it could defend by itself. The artillery had to be able to direct an unobstructed fire against the base of the hill otherwise the enemy force could form in the dead zone and begin its assault up the hill unopposed by the artillery. Officers were cautioned, however, against ever placing artillery on either steep hills or high elevations. Ideally, artillery was placed on elevations whose height was 1% of the distance to the target and were never to be placed upon hills where the elevation was greater than 7% of this distance. When artillery was required to defend a lofty hill or elevation, whose height made it impossible for the artillery to command the base, artillery officers were advised, if at all possible, to place the battery lower along the slope, such as at the halfway point.” The problem of course, was that artillery could not lower the barrels of their guns sufficiently to fire down steep slopes.

Slopes in General Staff

General Staff does not use hexagons or ‘zones’ of any sort. One of the failings of a system using hexes is that the entire hex has one elevation; there are no gradual slopes, just precipitous cliffs. From primary source elevation and topographical maps (like below) three-dimensional battlefields are constructed in the General Staff Map Editor (see below).

Topographical map with contour lines of Keyes’ attack at the battle of 1st Bull Run. From Wikipedia. Click to enlarge.

The General Staff Map Editor has a Terrain Visualizer tool (see below). It allows a line to be drawn between any two points on the map and a cross-section of the terrain and elevation to be displayed.

The area of Keyes’ attack in the General Staff Map Editor showing the cross-section Terrain Visualizer with slope calculations along the blue line drawn between the two user selected red circles. The white circle on the blue line is the current point being displayed by the vertical line in the Terrain Visualizer.

In the above image we see that the steepest part of the slope up Henry House hill is 19°. This is confirmed by the contour map, above and a photograph of the actual area below:

This panorama photographic view of the area covered by Keyes’ attack at 1st Bull Run was taken by Johnnie Jenkins December, 2020. The Robinson House was beyond the large tree, center. Click to enlarge.

As always, please feel free to contact me directly (Ezra[at]RiverviewAI.com) if you have any questions or comments.

References

References
1 I contacted respected military historian and researcher Brent Nosworthy who wrote back, “The effects of slopes on the speed of movement and the cohesion of troops is a very interesting question indeed. I am enclosing a rough draft of a chapter from The Metrics of War booklet I was working on last year. I think here and there is some information as to how it affected beast of burden’s ability to draw artillery. There were several articles about defending and attacking heights in Rider, John (Editor); British Military Library: A Complete Body of Military Knowledge; second edition, 2 volumes, London, 1798-1801. I cannot remember if there were specific references to these issues in these articles. I also recommend if you have not already consulted: Tielke, Johann Gottlieb, The field engineer; or instructions upon every branch of field fortification: … with plans and explanatory notes. Translated from the fourth … London, 2 volumes, 1789. Russell, John (Lieutenant – 96th Regiment of Foot); A Series of Military Experiments of Attack and Defence, Made in Hyde-Park, in 1802, London, 1806. Adye, Ralph Willet; The Bombardier, and Pocket Gunner, Second Edition, London, 1802. However, I am not certain they contain any references to the effect of the angle of slope on speed and cohesion.”

A Game of Birds & Wolves

Commander Roberts going over the lessons learned from “The Game.” Photo from, “A Game of Birds and Wolves,” by Simon Parkin.

Simon Parkin’s A Game of Birds and Wolves: The Ingenious Young Women Whose Secret Board Game Helped Win World War II, tells the fascinating story of a wargame created during the height of the U-Boat Atlantic campaign to be used as a testbed for discovering new anti-submarine tactics. In early 1941, when German wolf packs were destroying Allied shipping at a devastating rate, British Naval Commander Gilbert Roberts was taken out of retirement and personally ordered by Winston Churchill to, “Find out what is happening and sink the U-boats.”

Roberts was given the top floor of the Western Approaches HQ in Liverpool and a small group of WRENs (Women’s Royal Naval Service) as assistants to invent tactics that would counter the enemy wolf packs. His project would be called the Western Approaches Tactical Unit (WATU). (The Western Approaches HQ in Liverpool is now a museum and I can’t wait to visit it when this pandemic is over and General Staff is finished.)

The WATU project – known simply as, “The Game,” – is not the first example of a wargame used as a testbed to discover and improve combat maneuvers. Indeed, Scotsman John Clerk, wrote, An Essay on Naval Tactics: Systematical and Historical in 1779 after using, “…a small number of models of ships which, when disposed in proper arrangement, gave most correct representations of battle fleets… and being easily moved and put into any relative position required, and thus permanently seen and well considered, every possible idea of a naval system could be discussed without the possibility of any dispute.” Using these models Clerk proposed the tactic of “cutting the line,” that Nelson employed at Trafalgar1)https://en.wikipedia.org/wiki/John_Clerk_of_Eldin. Nelson would quote from Clerk’s essay in his famous Trafalgar Memorandum.

When Roberts reported to Sir Percy Noble, commander of Western Approaches he explained that he intended to, “develop a game that would enable the British to understand why the U-boats were proving so successful in sea battles and facilitate the development of counter-tactics… The game would become the basis for a school, where those fighting at sea could be taught the tactics. With a few adjustments.. [the] wargame could be used for either analysis or training.”2)A Game of Birds and Wolves, p. 143 Not surprisingly, Roberts was met with skepticism and not a little bit of derision. As one who is constantly pitching the importance of wargames to the U. S. military I understand the uphill fight that Roberts was facing. British destroyer commanders definitely did not want to go to Liverpool to, “play a game.” But, since the orders had come directly from Churchill, Noble had little choice but to give Roberts the top floor of the Western Approaches HQ for his ‘game’. Roberts made a tactical mistake by referring to WATU’s ‘product’ (in modern bureaucratic parlance) as a ‘game’. I learned this early on in my career: never say the word ‘game’ if it can be avoided. Call what you’re working on a ‘simulation’. Chess is a game. Risk is a game. But I write simulations; and clearly what Roberts was working on was a simulation, too. (That said, the phrase, “game it out,” has now passed into the common idiom and is synonymous with ‘simulation’.)

WATU simulated Fog of War by requiring the users to view the board through peep holes cut in canvas drapes. Submarine tracks (see above) were drawn in green chalk which, apparently, was not visible from the other side of the canvas sheets. The photo shows British destroyer commanders playing, “The Game,” and learning from the simulation. Photo from, “A Game of Birds and Wolves.”

In order to simulate Fog of War Roberts invented a system in which the destroyer commanders would view the board from behind a canvas sheet; their view of the battle restricted by peep holes cut in the canvas. Furthermore, submarine tracks were drawn with green chalk on the floor (see above photo) which, somehow, became invisible when viewed from the other side of the canvas. Consequently, the destroyer commanders had only a restricted view of the battle around them and were completely in the dark as to the simulated U-boats positions.

When Roberts began his work nobody in the British Admiralty knew U-boat tactics. Indeed, the German U-boat commanders were creating their tactics on the fly often ignoring the Kriegsmarine’s Memorandum for Submarine Commanders to fire torpedoes at no closer than 1,000 meters. U-boat ace, Otto Kretschmer was the first to insist that the most efficient way to attack convoys was to slip inside the destroyer screen, launch torpedoes at a range of about 500 meters, submerge and wait for the convoy to pass over them to make his escape ‘out the back’ of the convoy. Interestingly, this was the same technique that I discovered playing Sierra On Line’s  Aces of the Deep.

One of the first scenarios that Roberts investigated using his new wargame was the battle of Convoy HG 76. This was a multi-day contest involving 32 merchant ships, 24 escorts and 12 U-boats. It was considered a great Allied victory because five U-boats were sank (though the Allies only knew of three at the time) and 30 merchant ships made it home safely. Assisted by WRENs Jean Laidlaw and Janet Okell, they replayed the historical situation hoping to understand Allied commander Captain Frederick John “Johnnie” Walker’s anti-submarine maneuver ‘Buttercup’. The Buttercup maneuver (named after Walker’s pet name for his wife) involved, “on the order Buttercup… all of the escort ships would turn outward from the convoy. They would accelerate to full speed while letting loose star shells. If a U-boat was sighted, Walker would then mount a dogged pursuit, often ordering up to six of the nine ships in his [escort] group to stay with the vessel until it was destroyed.”3)A Game of Birds and Wolves, p. 155

What confused Roberts was that the Allied merchant Annavore was torpedoed while in the center of the convoy. As he and the WRENs replayed the scenario they could not duplicate reality unless the U-boat had, “entered the columns of the convoy from behind. And it must have done so on the surface, where it was able to travel at a faster speed than the ships. By approaching from astern, where the lookouts rarely checked, the U-boat would be able to slip inside the convoy undetected, fire at close range, then submerge in order to get away.”4)The Game off Birds and Wolves. P. 158

Using the scenario of when the escorts actually sank a U-boat using the Buttercup maneuver it was determined that they had succeeded by only accidentally hitting a U-boat that was joining the attack on the convoy and not the actual U-boat who had made the attack that they were pursuing. This makes sense when you realize that the attacking U-boat had submerged immediately after the attack and was waiting for the remaining convoy to pass overhead while the escorts were running far outside the perimeter of the convoy looking for it.

In other words, Walker’s Buttercup maneuver was, in fact, a terrible anti-submarine tactic.

The ‘Raspberry Maneuver’, created from numerous runs of ‘The Game’ was determined to an effective anti-submarine tactic. Here it is drawn by Admiral Usborne. From the book, “A Game of Birds and Wolves.” Click to enlarge.

The first successful anti-submarine tactic to be invented using the Game as a test bed was, “Raspberry,” (so called by Wren Ladlaw as a ‘raspberry‘ to Hitler). As you can see from the above drawing, upon discovery of a U-boat or a torpedo hit, the escorts draw closer to the convoy, not the opposite as in Walker’s Buttercup maneuver. When Roberts and the WRENs ran a scenario for Western Approaches commander Noble and his staff, Noble – who at first was highly skeptical – was so impressed that he immediately sent a message to Churchill, “The first investigations have shown a cardinal error in anti-U-boat tactics. A new, immediate and concerted counter-attack will be signaled to the fleet within twenty-four hours.” 5)The Game of Birds and Wolves, p. 162 By summer of 1942, using these new maneuvers, U-boat losses had quadrupled. Eventually other anti-U-boat maneuvers were also developed by the WATU team and all Atlantic destroyer commanders were ordered to WATU to play, “The Game,” and learn the lessons.

Obviously, there were other improvements in anti-submarine warfare that also contributed to the Allies winning the Battle of the North Atlantic. Nonetheless, it is interesting to read about the proper application of simulations in wartime. I have long been an advocate of simulations to test, “what if” scenarios. Indeed, this has been the main focus of my professional career for thirty plus years. It’s still an uphill battle.

References

References
1 https://en.wikipedia.org/wiki/John_Clerk_of_Eldin
2 A Game of Birds and Wolves, p. 143
3 A Game of Birds and Wolves, p. 155
4 The Game off Birds and Wolves. P. 158
5 The Game of Birds and Wolves, p. 162